General info (for all holidays)
Halloween
......non-scary alternatives
...pumpkins
...skulls, skeletons, fiends,
witches, masks,etc.
...scenes, dioramas
& houses
...more figures
...tabletop
& decorations
.......things in a bottle ....eyeballs
...larger
and outdoor things
...treat ideas for
trick-or-treat
...jewelry & wearables,
costume
...ghosts, glow-in-the-dark, transfers,
decals, liquid clay
...spiderweb &
other canes
...misc.
Dia de los Muertos
Thanksgiving/Autumn
Valentine's
Day
St. Patrick's Day
Spring,
Easter, MardiGras
4th of July
HOLIDAYS
& SEASONAL
General
Info......all holidays
SugarCraft's
*many* cutters... molds ... and mold cutters for all
seasons
http://www.sugarcraft.com/
(look halfway down on left side for "Holidays")
short
book:
http://www.d-originals.com/polymer.html
Special Seasons
(# 3334) ...cute characters, including themes re Halloween
(mummy), Thanksgiving (pilgrims, Native Americans), Valentines...also,
rag dolls, $7.99
Also
look at clip art... seasonal greeting cards.... kid's books,
etc., for many ideas.
Sculpey
brand clay now offers a number of Sculpey kits (for all their different
clays) which come with a number of bars of clay (and some instructions/projects...
some are seasonal, or relate to one topic like faces or dinosaurs, etc.)
http://www.clayfactory.net/sculpey/skits.htm
(Christmas, Halloween, and regular)
http://www.sculpey.com/Products/products_activitysets.htm
http://www.sculpey.com/Products/products_samplers.htm
(just clay, no projects)
(family.com's
many seasonal crafts/activities, not necessarily polymer!
http://family.go.com/crafts/
--click on Seasonal)
I like to use real eggs and cover
them with a design that includes translucent clay so you can see the real
egg inside. obirtasil
.......Oooo,
neat. If doing this, you might be able to light them from inside perhaps
by inserting a tiny white or colored xmas light ... these could be stabilized
somehow with a base, or placed in a bowl or table- or mantle-top nest of raffia,
in among a horn of plenty or flowers/veggies, etc., for decoration or centerpiece.
. . .. I can see them stamped/carved, covered with translucent canes...stained
glass-ed with clays or TLS, decal-ed, etc., etc.!
. . . any
holiday or special occasion would work too for themes. Diane B.
Halloween
non-scary
alternatives
for little
kids especially, even the scariest Halloween things can
be made in non-scary ways
....or for older kids who are uncomfortable with or just not interested in horror
and being frightened
...in fact, making things this way can be more
creative than doing a traditional scary things in predictable ways (see Jeannie's
un-scary alternative to a traditional haunted house below in Tabletop &
Decorations)
...some suggestions: ....make facial and body expressions
on figures or ghosts, etc., anything but angry or threatening .... no gore,
blood (though body parts, etc., can still be done in non-threatening ways... candy
eyeballs, blown-up latex gloves or plaster-filled ones could hold items ... for
moving things, no sudden jumps or getting too close (unless a kid chooses to approach)
--& some kids won't like things looming over them..."sensory dome"
boxes... fun special effects... giant candies used in various ways
... my large crawl-thru boxes painted like houses or painted with Halloween images
with windows to look out of ... large "pocket
ghost" (with treats in pockets)... and "balloon obstacle course"
(see below )
(more info on some of these are below in Tabletop &
Decorations and in Larger or Outdoor items)
PUMPKINS
pumpkin CANES:
Candy's lesson on making a jack 'o
lantern pumpkin cane
http://www.velocity.net/~cam/pumpkin/jack.html
Kim K's pumpkin cane
http://www.tlcnet.com/~polyclay/hallclay.html
(in two photos)...look now at beadyeyedbrat.com)
Darlene's pumpkin cane (website gone)
Sharon Saul's various black, orange, and white Hallow. canes (web,
hat, pumpkin, etc.)
http://www.tinapple.com/guild/retreat00.html
(gone)
Leigh's
lesson on pumpkin cane (Skinner
blend) http://polymerclaycentral.com/pumpkin.html
Anita's
various pumpkin canes
http://www.thumbprintsartwear.com/tier_3/fall_artwear/table_fall_artwear.html
3-D
pumpkins:
to
make a simple pumpkin
...roll a ball of orange clay (any shade)
...to
create the vertical indentations, lay a length (8-10"?) of dental
floss or heavy thread on the work surface, then place the pumpkin on it
...gently
pull up both ends of the thread... crisscross it over the pumkin and gently pull
tight (this will create one set of indentations on opposite sides from each other)
...remove
thread and repeat at least 2 more times (to create a total of 6 indentations around
pumpkin)
...for stem, press end of paintbrush or toothpick into top
of pumpkin... roll a small ball of green or brown clay into a tapered log and
place the small end in the depression
...for leaves, roll small ball
of green or brown (any shade), flatten slightly between fingers, pinch one end
to taper a bit, then indent with toothpick
.......for more possibilities
for leaves, see Sculpting > Flowers
& Leaves and also Canes-Instr. >
Leaves )
...can also add lt-brownish "vines" with loopy
raw clay ropes, or can prebake some tiny coils around a toothpick then insert
into raw pumpkin
dark
green pumpkins with white stripes (one is cut open showing a wedge
of orange flesh and seeds)
http://www.polymerclay.com.au/images/Jodie%20Pumpkins.jpg
Kevin
Buntin's fabulous pumpkins with faces (some scary... features are carved
out a little, with yellow underneath ... all antiqued
... depressions, then often colored in with brown before having yellow eye "balls"
added, etc ...some diff. shapes for mouths
http://www.kevinbuntin.com/misc_gallery.html
mieljolie's
various small pumpkins with various faces (as beads)
http://i229.photobucket.com/albums/ee2/thinnen/oyp%20halloween%20swap/pumpkin_bracelet.jpg
Kevin's
pumpkin king ... pumpkin head on clothed human body... also
scary polymer hands
http://www.kevinbuntin.com/pumpkin_king.html
Dawn
Schiller's pumpkin on green clay legs/feet
http://home.earthlink.net/~rhaiven/halloween.html
Johnny's
cute pumpkin Polypals (pumpkins gone now, but you'll get the idea anyway...also
look at space aliens)
http://polypals.com/v-web/gallery/Galleries
jack
'o lantern votives
....could cut out
areas for features wtih an Xacto or with small cutters,
and let light shine through
...Thomas'
lesson on making pumpkin
votives by covering with orange clay, pressing a jack 'o lantern
face which has been traced or drawn onto waxed paper on the
front, and using a ball stylus to indent the raw clay... pieces then cut
and removed with Xacto knife before baking
http://pcpolyzine.com/0310october/votive.html
....Kim's
lesson on cutting out features, then adding vines around top of
votive
http://www.theclaystore.com/pages-tutorials/polymer-clay-project-tutorials.html?action=showTut&tutID=45
....cut
could out areas of face, then replace with canes of
eyes, noses and mouths
....on my pumpkin votive
(instead of cutting out the features with an Xacto) ... I put a
layer of black clay underneath the layer of orange clay
.......I
put in the freezer for a while, then I carved the faces out with a toothpick
just down to the black layer (while flat?).... I enjoyed doing them and my daughter
loved them. Michelle
...can also onlay black clay cutouts in
shape of features onto pumpkin-colored votive like Susan B.
http://gallery.gundo.com/gallery/album95/SusanBFall11
(or http://www.polymerclaycentral.com/masterindex.html
ClayPen photos)
...jack-o-latern
face with onlaid features... they came out really cute and ,
and were just a little more than 1" in diameter
......we cut
out very tiny triangles and mouth shapes from black clay with an xacto knife
........then pressed them on... we also used a little bit of green for a stem.
Laura
For
my hollow pumpkin, I took well conditioned clay and rolled
it into a smooth ball the size of a grape
.... then I cupped the clay
in the palm of my hand while expanding the center with a special
ball-end tool, but the rounded back of a melon baller would also work I
think....starting off with a ball is what kept it so smooth I think ... (I then
pressed and pulled them into a hollow ball shape (like Donna Kato's "balloon"
method in Vessels > Hollow),
closed the sphere, and baked
..... I cut the tops off
with an exacto knife while they were still warm (careful not to squeeze
too much while cutting tho, I crushed one :)
...then I carved the
features after they were cool with my rotary drill (like a small Dremel).
Ronda
SKULLS,
SKELETONS, FIENDISH creatures, Witches, Masks, etc.
ConnieKat's
many "monster critters" ... fun heads, some glow-in-the-dark
http://www.cb-design.net/cbdmon0002.htm
(two pages)
*RebeccaK's
fun amorphous monsters (also click on More Monsters)
http://www.special-day.com/monsters/gallery.htm
skull
CANES:
Nora
Jean's lesson on making a skull cane on top of a pattern
(and surrounding it with clay patterns)
http://www.norajean.com/Biz-Archive/Mexico/DOD/Day-of-Dead-Grp.htm
(begin with 2H... then click on pg. 3,4,5 for the
rest)
Nora Jean's
skulls (cane slices on base clay?)
http://www.geocities.com/Area51/Shadowlands/2708/altar.html
my
skull
face cane ....and other weird face canes
http://s96.photobucket.com/albums/l163/DianeBB/canes
......raw slice ot it rolled onto raw black ball, then baked for head
on fingerpuppet...hair and hat added
http://i96.photobucket.com/albums/l163/DianeBB/sculpts_more/PiggyskeletonNatashacoloredfaces.jpg
Japaya's colorful Dia de los Muertos "sugar
skull" canes
http://i169.photobucket.com/albums/u232/meriporlared/DSCN2361.jpg
http://i169.photobucket.com/albums/u232/meriporlared/murrina2.jpg
skulls (& skeletons) 3-D SCULPTED:
Dinko's
lesson on making a reasonably simple sculpted skulls (not
a cane...not antiqued)
http://www.polymerclaycentral.com/castle/dinkoskull.html
hisart's mini-lesson on making 4 simple skulls (for the base of
a pedastal)
http://www.hirstarts.com/sculpt/sculpting.html#epoxy
(begin # 6)
hisart's
mini-lesson on making a small skull (to act as a door knocker)
http://www.hirstarts.com/tips2/tips2.html#torch
(# 14-15)
mieljolie's
simple skull beads with different expressions
http://i229.photobucket.com/albums/ee2/thinnen/oyp%20halloween%20swap/holly-go-frightly_necklace_03.jpg
Leslie
Blackford's skull (with hair...a la Psycho?) as small abstract figure
http://moodywoods.deviantart.com/art/skull-cat2-87625815
Alexandra's "fashion
victim" skulls, wearing glasses, bows, etc.
http://www.alexandrablythe.co.uk/photogallery/work/work-pics/Fashion%20Victims.jpg
krissykat 's molded skulls from skull charm ...antiqued with
black....as beads in a necklace
http://i19.photobucket.com/albums/b162/krissy-kat/S6300335.jpg
...showing the mold http://i19.photobucket.com/albums/b162/krissy-kat/S6300310.jpg
my molded skulls used as rings
....see
below in Jewelry & Wearables
various small colored skulls
held on toothpicks for painting on embellished features (then used
as knitting needle ends) by FairyFemme
http://s12.photobucket.com/albums/a235/FairyFemme/crafts/Calaveras
*Donna Worth's skulls + full skeletons (made over a chest "rock"
or clay shape... somewhat jointed)
http://www.picturetrail.com/gallery/view?p=999&gid=863030&uid=448958
(look around)
MaryClare's "meditating"
skeleton (cross-legged, sitting on Granitex rock)... skull ...glow-in-the-dark
clay
http://www.picturetrail.com/gallery/view?p=999&gid=6846326&uid=3236636
lesson on making skull with teeth
.....also
skeleton with and black body/arms/legs from black clay with individual
flat white bones onlaid onto body
http://www.makinsclay.com/US/eng/project_gallery/seasonal/halloween06.htm
Amir's skeleton as a smiling "dead fairy" with "leaf"
feet and hands and some clothing (lying on other leaves/flowers)...
made from fondant (to be put on a cake), but could be made from translucent
polymer clay (or trans + white)
http://i135.photobucket.com/albums/q130/Melladh/zaares1.jpg
... http://i473.photobucket.com/albums/rr100/VicTrollmor/Litdeparade2.jpg
Alexandra's laughing skeleton with glasses, sitting on bench reading
http://www.alexandrablythe.co.uk/photogallery/halloween/halloween-pics/dSkeleton-&-Tree.jpg
VirgoWolf's skull & skeleton bones of upper body
(....fairly anatomically correct)
http://i6.photobucket.com/albums/y217/EagleWolf1982/DSC05264.jpg
... http://tinyurl.com/38wqsw
skeleton
with 15 jointed parts (an eye-pin embbeded in the end of each section,
joined with eyepin of next section) made from glow-in-the-dark clay by
suitcase2space
http://i4.photobucket.com/albums/y150/leahtheking/DSCN3304.jpg
(more on jointed figures in Sculpting-Body
> Jointed)
Alexandra's human skeleton fossil
http://www.alexandrablythe.co.uk/photogallery/chicago/chicago-pics/Fabulous%20fossil.jpg
Rob's revolving
Janus-type skull
http://pcpolyzine.com/0301january/robc.html
wooden skeleton ...
rod puppet
http://www.lotzdollpages.com/pixpuppets/skelet1b.jpg
hooded Grim Reaper
scary sculpted fingers & face (antiqued, with glossed yellow
and orange eyes)
http://www.kevinbuntin.com/grim_reaper.html
Alexandra's Grim Reaper at desk
http://www.alexandrablythe.co.uk/photogallery/commissions/commissions-pics/24th-Death.jpg
Alexandra's deer skull with horns ... teeth
http://www.alexandrablythe.co.uk/photogallery/commissions/commissions-pics/Taxidermy1.jpg
(see many more skulls & skeletons below in Dia
de los Muertos and also in misc. other links)
many
tips on making skulls and skeletons plus skeleton hands, ribs,
and other body parts (with bread clay and other materialss), mostly larger
items , but inspirational and could cross over to clay
http://home.earthlink.net/~tekvov
sandyckato's
skulls & red devil head in Hell-o-ween (computer paintings,
but inspirational)
http://community.webshots.com/photo/45931468/45931890fxmBVi#
Lynne
N's witch and cauldron, on bed of orange leaves as base
http://www.polymerclaycentral.com/chall_sep04.html
Christel's scarecrow, ghost, witch
http://home.online.no/~raje/Polymer/pins/christmas.htm
Debbie G's witch with book, pot, hair
http://www.sculpey.com/Projects/projects_WitchsBrew.htm
Michelle L's lesson on witch
and pumpkin,+ hat
http://www.sculpey.com/Projects/projects_PumpkinWitch.htm
Adorable's tiny witch, pumpkins, etc.
http://www.lavendera.com/Adorables/adorables%20front%20page.htm
(click on Thanksgiving)
Verlene's
older hag figures, fabric clothes...one has skulls strung
on a cheesecloth "rope"
http://www.verlenebrooks.com/fadedfaces1.html
zombie
bride by lvl0rg4n, with
plaster cloth (wetted & draped around body and head) to make dress
(blood spattered) & for headwear...some in smaller strips... head and arms
painted with green, black and red
http://img.photobucket.com/albums/v461/lvl0rg4n/IMG_0110.jpg
Kevin
Buntin's witch or hag faces-figures and clothing,
with cauldron (both have green faces, one with red balls for eyes)
http://www.kevinbuntin.com/misc_gallery.html
(click on each for more)
http://www.kevinbuntin.com/imagepages/nighthags.html
Dawn S's hags,
fiends,
witches with clothing, hair,
sculpts for Halloween (plus many other "character" sculpts at
her site)
http://www.pacificnet.net/~rhaiven/halloween.html
Garie's
witch on jet-fired broomstick
http://www.garieinternational.com.sg/clay/321ignition.htm
meiljolie's
witch cameo pendant with antiquing
...face
made from a mold made from female face on a coin.... white + translucent mix cast
in the mold, then the face/hair/hat distorted
...SuperSculpey used for the
background (perhaps marbelized a little with the white + translucnet mix)... baked
....cameo
and background antiqued with reddish-orange (oil?) paint
....frame
for cameo cast in a mold using black clay...baked cameo pressed into raw frame,
baked... part of frame painted with gold (acrylic paint?)
http://i229.photobucket.com/albums/ee2/thinnen/oyp%20halloween%20swap/cameo_witch_pin_02.jpg
(CUTE,
or not)
cute Frankenstein... bat...witch...candy
corn face (with hat)
http://gallery.gundo.com/gallery/album60/MissyCuteButtons
sitting
or reclining figure made from rice-filled glove + ball head
(lesson) --could be pumpkin head,e.g.
http://www.hgtv.com/hgtv/crafting/article/0,1789,HGTV_3352_1820443,00.html
Anita's
canes of skulls, scarecrow, bats, pumpkins, Fall leaves, etc.)
http://www.thumbprintsartwear.com/tier_3/fall_artwear/table_fall_artwear.html
Blueman's
scary-funny face...head has many sticking-out clay rods wrapped
loosely with wire... small cone of clay on end of each wire
http://www.gibe.org/blue/menu.html
(must
click on "Galerie," under Le modelage de la
pate fimo in left navigation bar)
Garie's
yucky yellow teeth & forked tongue in mouth of snake creature
http://www.garieinternational.com.sg/clay/alien2.htm
Crealand's
fiendish figures (devil, grim reaper, etc.)
http://crealand.free.fr/figurine.htm
Kevin
B's various fiendish heads and figures
http://www.kevinbuntin.com/misc_gallery.html
(click on each)
Tommie's fiendish zombie, Charon, devil girl, and other figures (look around)
http://www.moonlightarts.homestead.com/gallery2.html
(both gone).. http://www.reliquary.homestead.com/
fiendish skulls and other heads (resin cast from SuperSculpey originals)
http://www.foreverhalloween.com/gallery_prod_r1.html
Wayne the Dane's fiendish figures & his how-to videos
http://www.waynethedane.bizland.com/Gallery%20Index.htm
hirshart's lesson on making a fiendish face in bas relief
(and also a tower)
http://www.hirstarts.com/sculpt/sculpting.html
various fiendish fantasy figures (esp. MariaCastillo's)
http://pcpolyzine.com/0301january/0301fantasyart.html
Frank's
fiendish figures, skeletons, etc. (not clay, but many could be)
http://www.born2haunt.com/PROJECTH03.html
http://hometown.aol.com/fmoll10092/PROJECTM.html
various
figures from Hieronymus Bosch's paintings (in 3-D), by Parastone
Studios
http://www.3d-mouseion.com/engels/bosch_eng.htm
and http://tinyurl.com/3t3wq
Donna W's weird creature (bad faery)
http://www.picturetrail.com/gallery/view?p=999&gid=1299948&uid=448958
could put
scary heads on "pikes" (toothpicks) to stick in graveyards,
etc.
http://www.geocities.com/area51/corridor/9666/hpolepage.html
(these are made from life-size masks... just make small clay heads instead)
...see
also Things in a Bottle below
slug-like
and other alien creatures
http://www.geocities.com/~uncialle/alihauntpage.html
Garie's
"DeBug" over a ping pong ball (see Covering
> Plastics >More Plastics)
http://www.garieinternational.com.sg/clay/debug.htm
slug-like
and other alien creatures
http://www.geocities.com/~uncialle/alihauntpage.html
(see
more below in Skulls,Aliens, etc. and > Things in a Bottle......
and also in Kids
> Bugs, critters
Garie's
slightly scary masks (some made from Friendly Plastic, but could
easily be clay)
http://www.garieinternational.com.sg/clay/mask.htm
...http://www.garieinternational.com.sg/clay/mask2.htm
Frank's lesson on making wire "skull"
face... could be covered with clay?...or papier mache then clay
...
could be "mask," or face for a figure?... could be
smaller?
http://hometown.aol.com/fmoll10092/HOW201.html
Mighty
Max horror heads & creatures, etc., ...mask possibilites
too
http://www.spectrumplanet.com/html/mighty_max.htm
(slow loading and displaying)
polystyrene
foam made into tombstones, large or small sculpts of figures,
house decorations, caskets, skeletons, etc.
http://hotwirefoamfactory.com/customer/gallery/2_holidays.htm
(for
more spooky masks, see also below in Dia de los Muertos)
(for
many more masks of all kinds, see Heads-Masks
> Masks
..... including
a lesson on making a mask on your own face or on a form... these
can be embellished with paint, polymer, etc.)
MORE
FIGURES, etc.
Amy
K's lesson on making cute
mummy ....Frankenstein head ...
cat
...bat
.....also
the word "BOO" on a flat background of clay
http://www.sculpey.com/Projects/projects_AmazingHalloweenies.htm
(could use regular
clay too)
good lesson on making dressed Frankenstein
figure ... good lesson on face too
http://www.makinsclay.com/US/eng/project_gallery/seasonal/halloween07.htm
lesson on slightly different Frankenstein face
http://www.makinsclay.com/US/eng/project_gallery/seasonal/halloween09.htm
lesson
on making cute vampire + skull & crossbones on gravestone (air-dry
clay, but same with polymer)
http://www.makinsclay.com/US/eng/project_gallery/seasonal/halloween01.htm
Marcy's
figures (mummy, Frankenstein, witch)... faces... pumpkins,
etc.
http://www.marcysclaypen.com/halloween/halloween.html
*Jack's
pumpkin head figures, etc. http://community-2.webtv.net/BEAR_GUY_47/NEWFORHALLOWEEN2000/
(click on next pg)
Fayette's pumpkin heads, older women, and
cat (more realistic) (website gone)
Renee's ghosts, pumpkins, scarecrow http://www.hopscotchcreations.homestead.com/Fall.html
*Garie's
Halloween things ...including
slightly scary nodders on springs
......one nodder is eyeball
on spring over bottom half of face, one eye ball is just over ankles/feet
..... ghost & one other have clay covered springs (...for
more on nodders, see Kids > Sculpting >
Robots,etc.)
....also dismembered finger on base of "blood"
....dinosaur... aliens, etc.
http://www.garieinternational.com.sg/clay/horror.htm
Sculpey's
various lessons on Halloween themes
http://www.sculpey.com/projects_seasonal.htm
all kinds of Halloween
ideas & links at one site.....scarecrow, aliens and critter/creatures
in specimen bottles, etc.
http://www.geocities.com/~uncialle/index.html
the Scarecrow, Halloween
Wooden Signs, a Pond Monster, a Halloween Graveyard Terrarium, Heads on Pikes,
an Indian Burial Platform, Alien Life Forms, Eye-Bead Demons, Totem Signs, a Dead-in-Bed
Skeleton, a Mummy, a Crusader, the Grim Reaper, the Heartthrob, Blood, and a Ghostly
Ghost.
To find all these project pages, look for the Previous Haunt
or Making the . . . link at the bottom of the Haunt Page you are on
stuffed-body
scarecrows (non-polymer) (website
gone)
Christel's
very complete lesson on making a troll (or other)
face/head ....also coloring with acrylic paints
http://www.pcpolyzine.com/may2001/troll.html
sandyckato's many inspirational
items (in graphic paintings) ..click on Halloween and Hell-o-ween
http://community.webshots.com/user/sandyckato
(can be very slow loading)
Eni's student
galleries of fantasy critters and fantasy structures (interior
& exterior) (not polymer, but lots of inspiration)
http://www.3dworkshops.com
(coming back?)
SCENES,
Dioramas ...& HOUSES
Garie Sim's
students' various wonderful Halloween houses (small to large), with
figures, other scenery, etc.
http://www.garieinternational.com.sg/clay/haunted_kids.htm
http://www.garieinternational.com.sg/clay/haunted_kids2.htm
Flo's
graveyard and figures diorama in a foam pumpkin (front cut to create
large craggy window)
http://www.picturetrail.com/gallery/view?p=999&gid=297872&uid=155794
10-20
scenes re Halloween, haunted areas, scenes in pumpkin,
etc. (photos)
http://elbourne.org/village/gallery.mv
B.B.O.'s
Halloween diorama in standing, open box, with hay bale, ghost,
fence, trees, plus gourds, candies, many pumpkins, etc.
http://www.belarabeach.com/Halloween.html
Shirl's
indoor Halloween scene (in frame-box) with skeletons in orange
party hats.. sitting at orange and black draped table, filled
with Halloween food... bats, etc. and other Hall. decorations
http://members.shaw.ca/shirl.rose/Shirls%20Page/otherprojects.htm
Betsy's
cobwebby old black stove, with food
http://www.angelfire.com/art2/smallstuff/page6.html
Shirl's
dungeon rooms scene created in a drawer ...walls put
in drawer to divide it into rooms...+ skeleton, guillotine, chains, etc.
(drawer
underneath a miniature "castle," but could just be freestanding)
http://members.shaw.ca/shirl.rose/Shirls%20Page/grandkids.htm
Marlene's
indoor Halloween diorama... witches, various others... red walls (not clay)
http://post.queensu.ca/~readel/Pictures/celebrations/Halloween.jpg
Oscelyn's
small (cute) Halloween scenes
...brown houses
(reg. or hexagonal) with indented bricks, indented grey bricks
bordered by row of upright candy corn pieces as path to house, roof tiled
with Halloween color disk-mints, large crow on roof, lg. ghost
and cat, plus small acorn, pumpkin, etc.
http://www.whimsicalclaycreations.com/Autumn.html
Faye's
graveyard scene (various figures, etc.) in long planter box filled
with bark bits
http://community.webshots.com/album/208105613SrhuhR
Uncialle's
(mini-lesson) for using an old aquarium to contain a Halloween landscape
(....graveyard scene)
.....it has real grass and soil
... will take about 4 weeks
for grass to grow in completely
...begin
with few inches of potting soil in bottom... make higher in center, or
otherwise shape a hill or 2...she has a cemetery hill on one side
.......
water soil without disturbing its shape, and scatter 2 Tblsp of grass
seed on soil, pressing it in a bit
...insert branched twigs for
trees
...make 1-2" clay tombstones (white or light gray/brown),
3/8" thick (can scratch shapes like rounded rectangles, crosses, doves,
etc.on raw tombstones, then maybe add cracks or chipped off areas .. bake... stain,
antique and/or sponge them with various thinned gray, white or black
paint) .........(she paints
on SuperSculpey, but not nec.)
........press tombstones into seeded
soil (can lean to one side, if wanted)
....pumpkin field in one corner...
make/bake pumpkins ... press into soil with tiny fake ivy "vines"
....create a stone wall..... pond... or whatever else you want
...
turn on the aquarium light (or put in a sunny spot) for 8-12 hrs/day
...keep the soil moist till Halloween
http://www.geocities.com/~uncialle/pockhauntpage.html
Wanna's
various wonderful Halloween scenes made by children... created
with clay & resin items and natural materials...(+ small houses
found at craft store in floral supplies near fake birds, etc.).
http://wannainelpaso.com/childrenprojects/ghost_houses.shtml
http://wannainelpaso.com/childrenprojects/the_trick_or_treater.shtml
http://wannainelpaso.com/childrenprojects/the_witchs_supper.shtml
(witch's supper scene)
Frank's
graveyard scene, with (top halves) of skeletons rising out
of the ground... various monuments... tree, etc.
http://www.born2haunt.com/Crise01.html
also zombies http://www.born2haunt.com/Ciszombies01.html
..scene
with large trees (twisted wire covered w/ clay) ...cauldron
with skulls at bottom...
witches/hags swapping recipes
.... giant spider (wire armature) &
web ... tombstones, plaques, etc. (web, skulls, liquid in
pot glow in the dark)
http://www.born2haunt.com/Ciswitches01.html
Frank's
tombstones (Celtic Crosses, grave plaques, etc.), and partial
rock wall
http://www.born2haunt.com/Ctombstones01.html
lesson
on making gravestone with skull
& crossbones on it +
cute vampire (air-dry clay, but polymer same)
http://www.makinsclay.com/US/eng/project_gallery/seasonal/halloween01.htm
Alexandra's
large (2'x2') fenced-in Halloween garden scene
...greenhouse
with flowers/plants, small pond with crocodile, raven on skull,
dragon around lamppost, stone pavers, pumpkins, scarecrow,
burned out tree with cut out pumpkin features, skeleton seated
on bench, wishing well and more...(fence and greenhouse prob. balsa wood)
...some items lit (mushrooms, compost, etc.)
http://www.alexandrablythe.co.uk/garden.htm
(click on all photos for enlargements)
Bill Lankford's haunted chateau-type house (....yard ...multi-rock
foundation .... Smuggler's Cave entrance)
http://www.billlankford.com/haunted_house.htm
Kitty's haunted house, with laboratory bottles... "food"...
hand, etc.
http://chrisminis.bravepages.com/khalloween/haunths.html
Ladybug's Halloween Tree & Pumpkin Fairy, scenes
http://www.ladybug-fairies.com/scenes.htm
Oscelyn's
small Halloween houses with "stone" walkway,
candy roofs, cat, ghost, acorn, etc.
(gone)
Barb's
haunted porch (website gone)
*dlife's Halloween several scenes with figures, etc.
(not nec. polymer) (website gone)
Laura's
*tiny* haunted house (painted metal) & figures (website
gone)
Donna's small Halloween scene (website gone)
GINGERBREAD
...several
Halloween themed (gingerbread)
houses and scenes and figures
http://www.frankysattic.com
(especially Deni Cole: Peter Pumpkin 2000 ...Roberta Merwin: 2000 Haunted
House ...Deb Third: Munster Style 2002 ...Anderson: Haunted House
2002 ....and various castles/mansions)
........also loads
of tips and patterns for making real gingerbread houses
Halloween
house (uses candy melts in squeeze bottle-- melted in microwave-- instead
of icing for glue)
http://holidayorganizer.com/food/gingerharvest.html
gingerbread
Halloween house, with yard scene
(gone)
TIP: to make gingerbread
houses "black" in color for Halloween,
use chocolate-colored frosting, or graham crackers or
cookies
Frank's
lesson on constructing small but complex "Munster House"
(about 1
ft. wide) with clay ...to
be part of Halloween "village"
...uses cardstock and
tape to create four basic walls ...(he works on a large tile, or bakes pieces
separately?)
...(then removes tape? and) makes 1/8"-thick (thickest
pasta machine setting) clay piece for each cardstock template
...he
(bakes each piece?) and cools... then holds the pieces together with clay
at the seams (and bakes again?)
....then (or after house completed?)
he goes over the seams (inside and out) with more clay to give the joint more
support and make it look neater
...he continues to add new pieces
of cardstock held with tape to decide on the next parts to make (porch,
turrets, roof, etc.)
...he adds details like windows, and rock walls (some
are cutout areas, some are onlays with cutouts and more onlay for details)
...(at
some point he adds a 1/4" thick layer of clay around the house as "ground"...
and will eventually add wire-armature trees & a tombstone)
...he
uses SuperSculpey, and will paint over it later
http://www.born2haunt.com/CmyhauntedH01.html......
http://www.born2haunt.com/Cmunsterhouse01.html
Kim
K and Tom's lesson on making a freestanding and multi-level
house with two roofs (Halloween)
http://pcpolyzine.com/0310october/haunted.html
... they use a paper pattern (like making a gingerbread house) to cut
the 4 sides and 7 roof parts on a non-glazed tile (one roof
is tall flat pyramid) and the base
(making sure lines are straight)
.... they texture the exteriors, and cut
out the openings for windows/doors, and lastly darken the textured clay with thinned
black acrylic paint before baking (and cooling under weights)
... they then
take slices from various translucent and white (or black) canes
(spider webs, skull face, bats) and attach to the inside of each wall
with dots of liquid clay and bake 20 min
...shutters,
ghosts, etc., are made and attached to the outside of each wall with
liquid clay (and baked again?)
...the 4 walls are then joined in sections
with superglue, (sanding or beveling if necessary to make them meet well),
then the walls-unit is glued to the clay base piece (the forward wall last,
and pressed out if slightly bowed to meet the edge)... a final small strip of
wall is glued between the extending areas of the taller walls, which helps stabilize
the structure
...roofs and porch extensions are glued on
Frank's
creepy castle ... beginning with 4 large cylindrical towers... adding
wall between each... then creating stone wall for gate
http://www.born2haunt.com/Ccastle01.html
My
then-10 YO son decided to make a Halloween scene from Charlie Brown...he
made a pumpkin patch complete with Snoopy and Linus!
...I had a leaf punch
that made maple leaves approx 1" across (I rolled the green clay real
thin, then punched out the leaves)... they draped over the pumpkins
beautifully as vines. Denise
Garie's "Haunted Toilet"
scene with ghost . . lessons on making a wood wall, tile
floor, toilet, and ghost (for a waterglobe, but wouldn't have to be)
http://pcpolyzine.com/0209september/toilet01.html
(click on all 3 parts!)
http://pcpolyzine.com/0209september/plan.html
(plans)
Garie's
lesson on a dancing ghost suspended over small.
graveyard scene
(...ghost and base-with-pole in suction cup each contain
a magnet so ghost will move around if touched slightly)
http://www.garieinternational.com.sg/clay/projects/dancing_ghost.htm
hirstart's
lessons:
... dead trees ... don't have many branches...
have lots of bends and twists ...taper quickly from very thick at the bottom,
to very thin at the top
.......so he likes to use roots from small trees
or plants (try to find tiny trees just beginning to grow, in very soft ground,
or roots sticking out of sides of creekbeds)... pull out (or cut off) ...wash
and dry roots ... gently dry-brush paint with med. gray)
....pile of freshly
dug-up dirt (e.g., around open grave)... create depression in foam
or whatever base you're using to inidicate where dirt was dug out... mix small
batch of extra thick plaster ...spoon on wherever desired (if too thin
to mound up, let sit few minutes before continuing)...then sprinkle
dry plaster over the wet (will soak up water, leaving dirt texture)....lightly
mist with water to set. .. dry completely (overnight maybe).....
paint with a thinned dark brown color (crevices too).... dry-brush
an earth color (same color as rest of ground)... can also brush on a brown
ink wash (...pile should be darker than rest of ground)
http://www.hirstarts.com/tips13/tips13.html
clay
coffin with clay moss-lichen... cracking open... skeleton hand extruding
through crack
http://www.bpcg.org.uk/images/midlandsregion/tombstone.jpg
lichen
cane ...translucent rods and lightly-tinted green translucent rods in center,
surrounded by darkish trans+ green, wrapped with light translucent green
http://www.bpcg.org.uk/images/midlandsregion/lichencane.JPG
hirstart's
open tomb (with arches).... and stone sarcophagus
http://www.hirstarts.com/tomb/tomb.html
...hirstart's patterns for sarcophagus & open tomb... sarcophagus
could be thick tiles of polymer clay made with faux
stone, and impressed with "carved" texture
....make rectangular
tile for base... add 2 same-length tiles for long sides... add 2 end
tiles covering edges of bottom and long side tiles... make top tile
to fit completed sarcophagus
......trim can be added around
base of sarcophagus with textured quarter-round rods same
length as each side, separated by rectangular post at each corner
with ball on top
http://www.hirstarts.com/plans/tombplan.pdf
(Acrobat required for access)
Susan
S's lesson on making a sarcophagus (with air-dry clay) over
a small rectangular box about 3" x 6" (or could use block of wood or styrofoam
covered with alum. foil, etc. with polymer clay)... after all but one long bottom
side is covered with clay, onlays of heads, headgear, crossed arms, and feet are
added, and some cases have added clay around top and bottom of shape to indicate
lower levels of the mummy case ...(hers are then painted with gold and pearly
paint)
http://www.dia.org/education/egypt-teachers/mummies/slavik/activity.htm
(Sessions 3 & 4)
many photos
of sarcophagi for inspiration, via Google (Egyptian and other... stone
ones and inner ones)
http://tinyurl.com/j3jgt
hirstart's
lesson on building a gallows or guillotine
http://www.hirstarts.com/plank/plank.html#gallows
(could use clay)
hirstart's graveyard scene and his silicone molds
.... tombstones (small, and also larger . tombstone monuments)....
caskets... fences need stiffer material?
http://www.hirstarts.com/grave/grave.html
cemetery
miniatures (mini-lessons on)
http://www.devotedtolemax.com/
(click on Tips...
then on Small Decorative Items)
Frank's
various sculpted tombstones http://www.born2haunt.com/Ctombstones01.html
Hirstart's
many stone buildings + bridges ... tables .... fireplaces,
etc.
....Gothic,structures....castles & dungeons...villages...fieldstone.
http://www.hirstarts.com/projects.html
--could translate to polymer)
Heather's
lesson on making a New Orleans style tomb "cemetery clock"
(she cuts the tomb outline from a slab of plain white Sculpey, draws details
into the raw clay with a ballpoint pen, adds onlaid squiggles/etc.....bakes ...
glazes all over with thinned black acrylic paint).....adds
clockwork.
http://www.hgtv.com/hgtv/cr_occasions_halloween/article/0,1789,HGTV_3274_3321326,00.html
Frank's
stone and "wrought iron" (wire) gate, for front of one
of his houses... spikes on stone wall too
...7 1/2" long, 5" high and
3" wide... wadded alum. foil under stone walls ....spikes and gate are
made of wire painted black
http://www.born2haunt.com/hcvgate01.html
Linda
WP's lesson on making a scene with lumpy "ground"
....with added a purchased mini-fence and some tomatoes
... would
look Halloweeny or like an autumn scene if the tomatoes were pumpkins
instead
(see Houses-Structures >
Backgrounds for more info on lesson)
http://www.hgtv.com/hgtv/crafting/article/0,,HGTV_3352_1915128,00.html
(see also Houses-Structures
for more Halloween items... for castles & fantasy
structures
... and for Halloween candies such as caramel apples,
etc.)
sandyckato's
many graphic Halloween scenes and items
http://community.webshots.com/album/45788101PgcBoh
many
more ideas (general & specific) for making little scenes
of all kinds here at GlassAttic:
Houses-Structures
, for houses, castles, ground, stone-brick, background
scenery, etc.
Kids-Beginners >
Scenes & Dioramas
Sculpting
> Bases
Christmas
> Sculpting and Websites
Miniatures
for plants, food, other items & scenes
....ALSO,
for loads more ideas
look at the many other "Halloween pages"
on the web
TABLETOP
& DECORATION.... + OTHER items
Verlene's
skull container (open top... eyeballs in cranium)
http://www.verlenebrooks.com/halloween1a.html
hirshart's
lesson on making 4 simple skulls (with putty) then leaning them
back and placing with a base and top (and filling in the empty center) to form
the decorative base for a column (or pillar candle?)
http://www.hirstarts.com/sculpt/sculpting.html
Kevin's
somewhat scary face candle holders (for pillar or taper candles)...
these have also been painted and glazed
http://www.kevinbuntin.com/misc_gallery.html
Donna
Kato's lesson on making a free-standing translucent lantern (like a luminaria)
over cardstock or flexible cardboard which is wrapped around a fat candle, or
other shape (use colored clays, somewhat translucent or opaque) to create other
decorations to block the light or let it through less --the thinner the clay,
the more translucent, and some colors are more translucent than others --check
them out before using
..... could use these for pumpkin or other
face candle holders or luminarias also
http://sunnisan.com/crafts/stainglass1.html
2
mirrors... one mostly-covered with clay, with onlays of alien and
stars (leaving large hole in clay outside mirror area for holding it?)
... and one mirror with skull and flower onlays, by
econolines r 4 girls
http://i160.photobucket.com/albums/t196/econolines/100_2194.jpg
(for
more on covering and embellishing mirrors, see Frames
> Mirrors)
Eberhard Faber's
silver,. black and orange items
...2 candle holders (one irregular sheet around pillar candle, the
other around cane slice ball with small hole in top --looks like those caned candles),
and a irregular napkin ring
http://www.eberhardfaber.de/Kerzenleuchter.EBERHARDFABER?ActiveID=8905
also
EF's various Hall. items, mostly-covered glass and votives
with cutouts, napkin ring, tiny items on toothpicks in food
http://www.eberhardfaber.com/Halloween_copy5.EBERHARDFABER?ActiveID=17227
Thomas'
bat lesson .... flat cutout from sheet of black clay using
paper pattern
... can drape and bake over an accordion folded
index card to give wings more dimension and make them look as if they're
flying (or bake flat)
....these can be hung as a mobile too...
(see also ghost mobiles below)
http://pcpolyzine.com/0310october/bats.html
for
cutters (mini & regular size) for Halloween, Autumn, Harvest ...
see Cutters > Sources (Online)
Garie
S's very flexible bookmark made from from Sculpey's Bake and Bend clay
(SuperFlex)
....(a witch hand + optional blood --may want to "highlight"
the textured hand with brown acrylic paint though rather than "scorching" the
clay with a heat gun, for total safety)
http://www.garieinternational.com.sg/clay/bookmark1.htm
(click also on bookmark pgs 2 & 3 for ghosts,
etc.)
(...thin flexible bookmarks can also be made from any strong clay (Premo,
Fimo...no Sculpey)... see more in Cards> Bookmarks)
many
items (Halloween-themed)
...attached to a grapevine Halloween
wreath covered with cobwebs (made by MSAT mailing list group)
http://pcpolyzine.com/0310october/msatwreath.html
...for example:
...tiny scene with two ghosts in old fenced courtyard?
...molded spiders on spiderwebs (black highlighted with various metallic
powders)
...3-D spiders sitting on spider webs made from translucent clay?
drizzled with pattern of web with gray liquid clay?
...mummy
covered with dark gauze, in coffin of stamped powdered clay
...corn
on the cob, still in (paper?) husks
...tiny spirit figures (Dia
de los Muertos types)
...candy corn, witches, pumpkins,
cats, bats, ghosts, etc. (canes or sculpts)
Betsy's Halloween
candies on sticks... lollipops of various types, painted pumpkin faces,e tc.
http://www.angelfire.com/art2/smallstuff/page6.html
see
more Halloween figures of various types above in Figures
lessons
on using terra cotta clay pots (regular size or minis)
to make Halloween figures or treat dishes, etc. (could be adapted
to clay --see Covering>Terra Cotta)
http://tinyurl.com/3qxax
BODY
PARTS (hands, fingers, etc.)
hands
...shaped hand (life-size)...lesson
on filling a latex glove with plaster, shaping and drying over an
upturned bowl, e.g., to shape
....gently remove glove next day... sand
any imperfections (fine sandpaper or drywall sander sheets)
....dry totally
before painting (green, etc.) or cover with polymer (see Covering
> Plaster for details)
.....then use like "Thing"
....or to hold something or a bowl, drape over something, etc.
http://www.hgtv.com/hgtv/cr_home_accessories/article/0,1789,HGTV_3255_4044731,00.html
.......(see
lesson on rice-filled glove for figure above)
..mummy hand and
wrist (life size--not polymer) made with latex glove...looped wire
in each finger...stuffed with fiberfill
......stack upturned 4"
terra cotta pot on a 4 1/2" upturned pot to create wrists/stands
......all
wrapped with torn unbleached muslin strips dipped in fabric stiffener
http://www.tallmouse.com/projects/halloween/mumsy/index.htm
fingers
...real "finger sandwiches"
...could place a clay finger between 2 slices of bread (or wrapped it up like
a pig-in-blanket)
.......or make both finger and bread from clay, and stack-bake
together as a sculpture
......I made a mold of my son's finger from SuperSculpey
(actually, just from the top/nail side), then cast a log of more SS into the baked
mold to create the cut-off finger I put in a specimen jar... see link below in
Things in a Bottle for photo)
.....the fingers could be all different, or from
different people... and they could have baked fingernails (painted or not) or
even fake acrylic nails pushed into them before baking the fingers (let hang out
one end of "sandwich")
... or could also be placed among other
real "finger sandwiches" (with sufficient warning NOT
to EAT... maybe not for kids)
faces
... "face boxes" (in this case, Frankenstein, Dracula, etc.)
......
papier mache boxes of various shapes, with face as box top (painted, but
could be clay covered)
http://www.tallmouse.com/projects/halloween/index.htm
Donna
W's Egyptian canopic jars and much more!
http://www.picturetrail.com/gallery/view?p=6&uid=448958&
Teri's
"google eye" Halloween pens (.....eyeballs on
coiled wire, attached near back ends of pens)
http://hobbystage.net/art/media.cgi?site=teri&folder=*&group=1&page=*&id=1034346126-002009
Miracle's
(memo holder) eyes showing through egg hole, hands holding sign
http://mycraftyphotos.homestead.com/HalloWees.html
cool
spider ...made with wire and seed/other beads (could also
be pin)
http://jewelrymaking.about.com/library/weekly/aa101199.htm
sunni's
lesson on dipping/painting dried plant material, fresh flowers/etc.,
and flies! with Translucent Liquid Sculpey (see LS category
for more info)
http://members.spree.com/sip/sunnidaze/me/experment.html
Suzanne
dipped a turkey neck bone in liquid clay for a necklace component
http://www.picturetrail.com/gallery/view?p=999&gid=279317&uid=149408
creepy-looking squiggly
ropes onlaid on boxes or anything you want to look creepy ...
good use for wild hair too
...
many thin clay ropes laid in long, waving or squiggly
strands on a surface of clay
...... ropes could also be used together
for other things like roots
of a tree, or seaweed or
other organic looks, etc
Byrd's very long ropes on a
box lid & bottom... ropes grow up and partly around the round
ball used as the lid's handle
http://www.3wave.com/chhome/cha/clayart/gorkbox.html
Byrd's long waving strands laid out sort of radially
...tiny clay seashells are nestled in between the strands like buds
http://www.3wave.com/chhome/cha/clayart/heartbox.html
I've
been given the task of creating a centerpiece for our group's annual Halloween
party.
....all I have to work with so far is a fake skull, a plastic wreath,
some pumpkin cane, bat and ghost slices. Now where do I go with it?
...this
is what has happened so far....
.....wreath has been spray-painted black
(...HINT: wash
your wreath in hot soapy dishwater before you attempt to spray paint it).
.....purple
string of lights has been wired to it.
.....skull
has been scrunched into floral oasis in middle of wreath
........ skull will
have two light sticks inside, and gummy worms will be coming out
of its eye sockets.
.....glue
gun will be used to secure cane slices to wreath. Using Julie's witch face cane,
making a few Dinko skulls to go with what I already have.
.....bag
o' spider web will go over whole thing. Thank you to designers Deidre,
SJ & A. Nony Mouse Kim K.
..I'd paint a small cardboard box
all black, decorate the sides with cane slices, put the wreath
on top, and stick the skull on top of the wreath.
......if you have
the time, get green floral foam and stick a block it underneath the skull
so you can stick wire into the foam, and put cane slices at the
end of the wire so they "float" around the skull.
.....also,
cover all the green foam with curly orange and black streamer paper, so
no one can see it.
..... I'd also weight the cardboard box somehow -- a rock
inside should do it -- so it doesn't tip over. Deirdre
..you could maybe spray
the wreath black or purple or orange or something...hang
it like a donut, then make beads and slices for some dangles.
Sarajane
balloon heads ....can sit in window
or on table, etc.
...white balloons for ghost or skeleton...
black for skeleton or fiend... or orange for jack 'o lanterns
...blow up balloon... poke hole in tuna can bottom and tape a balloon stem
through it (upside down can)
...glue on baked cutouts of polymer eyes,
noses, mouths with low-melt hot glue gun (or use black paper)
(DB...add my photo)
(see
Missy's tiny sculpted or molded polymer
items attached to a needlepoint scene,
below in Jewelry)
UN-scary alternative
to the traditional walk-through haunted house (specially designed
for little kids)
....Jeannie created The Pumpkin Hut at a small
children's art gallery ...kids entered through a doorway into a lighted, authentically
scented, giant pumpkin... walked a path of Jack 'O Lanterns, under large hanging
candy corn.... had a "bat room" where they peeked through a window to see all
kinds of fluorescent-painted baseball bats (and cobwebs) hanging from the ceiling,
illuminated with black light.
http://www.pcpolyzine.com/2005fall/journal.html
various lessons on Halloween projects which could
be done with, or embellished with, polymer clay
http://www.tallmouse.com/projects/halloween
(at tallmouse's site)
more lessons with Halloween themes which
could be adapted to polymer clay (also at michaels.com)
http://www.michaels.com/art/online/projectlist?categoryid=54
tombstones,
and large or small sculpts of figures like skeletons, skulls, witches,
pumpkins, etc., can be created with polystyrene foams (white
like packing foam, craft foam... or the denser type pink/blue foams from
hardware stores sold as insulation)
....then can cover with polymer clay (should
first cover with aluminum foil if clay completely covering)... or they
can be painted, etc.
http://hotwirefoamfactory.com/products/customer/gallery/2_holidays.htm
(...for
more info on using & shaping foams in many ways, see Covering
> Plastics > #6 Polystyrenes)
projects
and photos of all kinds of decorating ideas for Halloween
http://www.geocities.com/kraftproject/home-holiday.html
(look esp.
at 2002)
"Goth"
ideas... but list is also very applicable to Halloween-themed
items... colors, etc.<g>
http://www.geocities.com/RainForest/Vines/2010/dabasics.html
http://www.peak.sfu.ca/~bess/roomgothic.html
"things".
in a bottle
Christian Matzke's
specimen-type thing-in-a-bottle
--lesson for embryonic
polymer creature, in bottle, with greenish water (weight in bottom to keep it
from floating); his is painted, then sprayed with acrylic gloss varnish,
but not necessary ....(also has lesson on making a faux "aged"
paper label)
http://www.miskatonic.net/pickman/mythos/bottle.htm
...my things in jars and in specimen bottles ,
with tinted water, lids painted black or stoppers
made (a SuperSculpey finger created from a mold of my son's finger, a catnip
mouse, large plastic bugs, sculped heads, foot from mold, tiny
troll doll with lots of hair, long glow-in-the-dark snake,
little Halloween fingerpuppets or figures, ghost-shape cane slices
of polymer, many with cotton or gauze
in bottom or top, etc
http://s96.photobucket.com/albums/l163/DianeBB/Halloween
(...click on photos 2-4)\
amorphous
thing-in-a-jar, with coca cola as liquid (would the acid in the coke eventually
destroy?)
http://www.traipse.com/thing_in_a_jar/
alien critter ....in specimen bottles
http://www.geocities.com/~uncialle/alihauntpage.html
eyeballs
... eyes
see
also Sculpey's lesson on a bloodshot eyeball necklace
http://www.sculpey.com/Projects/projects_eyeball_necklace.htm
Garie's
eye and
eyeball nodders (on springs) ......one is eyeball on spring
over bottom half of face ... one eye ball is just over ankles/feet
(...for
more on nodders, see Kids > Sculpting >
Robots,etc.)
http://www.garieinternational.com.sg/clay/horror.htm
eyeballs
(on springs) and nose to be worn on face (like glasses) http://www.garieinternational.com.sg/clay/eyeoball.htm
ping
pong balls covered with clay could make good eyeballs. Diane B. (see
Covering > Plastic
for more on ping pong balls)
I can get
away with some roughness with this character because he's a demon!
..
I rolled a football of clay in my hands, made it a bit more eye shaped ... then
sliced it in half to make the eyeballs.
...the lids were a thin
sheet of clay laid over the eyeballs.
...I didn't sculpt in the pupils
since it's a lot easier to paint what I want onto a smooth
eyeball
...... this demon has gra-green skin, and red reptilian
eyes. Nothing subtle about this guy, but he's for Halloween! Jody B
For pupils, look at
goat eyes ....they have the most alien eyes I have ever seen on
a real live creature.
....their pupils aren't slits like a cat.... they're
rounded "I" shapes, but horizontal ! Tiggersong
Also one nifty and wonderful trick is to
put a small piece of mirror underneath a gemstone for an eye.....
the mirror will reflect some light back trough the stone, which will sparkle
when it moves. .....I have made few gremlin pendants having "fire" eyes
that are somewhat creepy ...they seem to be more alive.
..... If
you do not have mirrors available, use a small, very straight piece of aluminum
foil. PöRRö
eye
bead cane (lesson) : make a (log) of black... roll a slab
of blue (around the log) with a bit of white contioned in (remember the clay darkens
when baked}, then a slab of white around the outside ... cut across this cane
and round the edges a little... pierce a hole across the slab and Viola!, an eye
bead...a red slab around the blue inside the white might resemble the blood
shot eye?
Maybe
I should try glow in the dark clay for Kerstin's eye-iris cane .
. . LOL
....might be fun too to hang
'em around for Halloween...Tonja
(see Sculpting-Body
and Heads-Masks
for more info on making eyes, faces and bodies)
LARGER
and OUTDOOR things
ghost made over small bush
or tree ...(hold sheet together with clothespins or safety pins)
...attach
black cutouts for eyes and mouth (from polymer clay, or black
construction paper, etc.) tosheet
....place a light under the bush (the whole
ghost will be lighted and quite visible from far away)
(DB
... add my photos)
see Kim Cavender's skull-flower
plant poke below in Dia del los Muertos
balloon obstacle course
...(can make many polymer items for something similar to this)
...I
created an obstacle course for small balloons for our elementary
school's Halloween Carnival
...each kid blew a blown balloon (water-bomb type)
through "paths" with (their individual) straw (--can't do this outside
though it it's a windy day!)
...the course was created on two
4x2' plywood sheets (so it could create a 90° bend, & was
easier to transport)
...for the walls creating the first path, I used
upturned plastic cups ...for walls on the 2nd sheet, I cut long blocks
of packing foam on one side with a hot wire cutter to form wavy top ...
I put feathers and all kinds of Halloween items along the
top of the "walls" to keep the balloon contained as it was being blown
along ... and also decorated here and there with other Halloween figures, toys,
etc.
...I used a large cardboard box I'd painted with Halloween
themes before between the two plywood sheets (the box also hid the straws,
balloons, and prizes I stored inside)
...all parts or items were a color
scheme of orange, pink, yellow, purple (+black, white)... some spray-painted
with fluorescents
...where the path turned 90°, I made a large arch
from more foam the balloon had to travel through
(...I used this carnival game
for several years, and it was always extremely popular!) Diane B.
(DB
... add my photos)
Another carnival "game"
I made was a friendly pocket ghost about 6-7' tall
for the school carnival (esp.for youngest kids)
...it
had lots of fancy fabric pockets around it's body (some were "foundation-pieced"
images) which held a treat for each kid ...they walked up to it and chose
one pocket to get a treat from
...the ghost body was a white sheet (twin prob.)
sewed into a big cylinder... gathered & tied it at one open end
...(put
a hat, scarf, etc., on it later when assembled)
...to hold the
sheet body up, I made a large sturdy disk from plywood and created braces
(or some kind of cylinder, can't remember now) in the center which could hold
a closet-type pole.
...then stuffed two large black garbage
bags and one small white trash bag with scrunched newspapers
(this was the hardest part!)
.....before closing the stuffed bags,
I worked a long wrapping-paper tube down through the center of each, and
also poked it through the bottom (then reinforced the bag hole a
bit with duct tape, and also used the tape to hold the bag in place on the tube)…
then tied off the top of the bag around the tube at the top end
.....(doing
all that allows the 3 stuffed bags to be threaded onto the vertical closet
rod one atop the other for a tall figure
...(having 3 sections
allowed me to transport the pieces in my small car then just assemble
at the carnival... and also meant I could store the piecesmore easily
from year to year by suspending the filled bags from my garage rafters with a
horizontal pipe threaded through the tubes in the bags.)
After the
sheet was draped over the bags on the pole at school, the ghost made quite an
impressive sight (& kids always loved it).
(DB
... add my photos)
joined, crawl-through
(large) cardboard boxes ... these were great fun for any kids small
enough to fit through them
...boxes were painted (brush and spray) on
the outside as houses (haunted or not), or with large Halloween items/themes
like ghost, cats along a picket fence, black mountain silhouette with orange-pink
fluorescent sky, Count Von Count, etc.
..some boxes painted on inside
with fluorescent stars, etc.
..all boxes had windows of various kinds
so light would shine through, and the kids could look out (or in)
(DB
... add my photos)
JEWELRY & WEARABLES, costumes
joann.com's
lesson on making "Spooky Bracelets" from simple
skulls, eyeballs, and cats (if link doesn't work, do Web search)
http://tinyurl.com/47wax
krissykat
's molded skulls from skull charm, antiqued with black....as
beads in a necklace with lg black beads
http://i19.photobucket.com/albums/b162/krissy-kat/S6300335.jpg
Kathy
W's Halloween necklaces made with 3 thick cane
slices and/or small molded pumpkins, candy corn,
ghosts... one molded item in center as pendant (on black cord separated by
small black beads)
http://www.kathyweinberg.com/s_jewelry.html
Ryan's
simple skulls necklace (website gone)
(more
skulls, plus skulls--and pumpkins/etc-- on necklaces, above in Skulls, Skeletons)
I
once made skull rings for my son's classmates
lesson:
...I
first made & baked a skull mold from a small, cheapie, plastic skull
I found (from a bag of Halloween rings?)
...pressed glow-in-the-dark
clay into the skull mold ...removed and baked the skull
...antiqued
the lower areas of most skulls with dark brown acrylic paint (plus
a few with gold acrylic paint or bluish paint, but didn't like those
as much--those are the only ones in the photo below though since they were
leftovers)
....then glued the flat-backed molded skulls to flat
band rings I'd made by forming flat noodles of clay around a dowel (leaving
a small gap for stretch), and baking... I might make them now as whole circles,
then cut the noddles apart on the rod while the clay was still warm to create
the gap ... kids thought they were very cool!. . .Diane B.
http://i96.photobucket.com/albums/l163/DianeBB/Halloween/d99b.jpg
...(for more rings made entirely from clay, or using
clay with wire bands, etc., see Jewelry
> Rings )
Damalias snake collar-
type neck piece would be great as part of a Halloween costume... the
snake is formed into a circular shape, but the head end is bent downward so that
after the snake collar is slipped around on'es neck, the head points straight
downward on chest (red eyes...covered with multi-wrapped bullseye cane slices)
...
also small-snake earrings
http://www.flickr.com/photos/papcg/2207372029
I made a vampire medallion for my little Dracula to wear
one Halloween . . . it became one of his favorite dress-up things too.
....it
was a sort-of star shape (powdered with gold?...hard to remember) about
3" wide, with a large, faceted, red plastic gem in the center;
the gem was surrounded by somewhat flattened tiny balls (hot glue
or clay?) around it acting as a bezel (actually I glued in the gem after
baking since it may have melted in the heat)
I hung it from a red ribbon
which I attached to the back, though can't remember how. It looked really genuine
and was a favorite dress-up item. Diane B.
http://i96.photobucket.com/albums/l163/DianeBB/Halloween/66b5.jpg
(...many
more Renaissance and ancient-looking jewelry items and lessons
are on the Jewelry page)
sanguinia's
polymer clay maggot or grub (as pendant)... made out of
translucent clay with a dab of ivory clay
... roll into a thick snake and
then start twisting. ...smooth off the "head" part, and pierce a hole
through it side to side....bake ... I also made a "lovely larva"
too using some orangey-brown and ivory clay.
my
son and I made a necklace of long bones (glow-in-the-dark clay),,
strung on elastic cording
...each bone
was formed by rolling a too-thick log thinner in the middle, leaving the
ends fatter, then indenting around each fat end with a tapestry
needle
...could instead add 2 balls to the end of a log, then smooth
a bit
http://i96.photobucket.com/albums/l163/DianeBB/Halloween/9249.jpg
Irish
Red made some tiny "Natasha" mirror-image beads
(see Beads) of a vampire, wizard, sorcerer,
green face, etc.
http://www.tlcnet.com/~polyclay/hallclay.html
(see
other places on this page for Halloween items used as jewelry ... do a
Ctrl + f search for necklace and/or earrings and/or bracelet
on this page)
buttons
are another thing that can be made with a theme (Halloween/Christmas/Valentines,
hobby or school, etc.)
...they could be used to hold something
together (top of a cape, e.g.), or just glued or sewn onto a sweatshirt,
hat, shoes, or other clothing
skull and spider buttons (flat-backed,
with 2 holes for sewing on)
http://www.craftsnscraps.com/buttons/buttons4.html
....Missy's
Halloween & Xmas buttons (tiny ghost, bat, pumpkin, gingergread figure)
http://pg.photos.yahoo.com/ph/miss_meme_30/detail?.dir=d8c9&.dnm=f468.jpg&.src=ph
(gone)
Missy's
tiny sculpted or molded shapes attached to needlepoint (or
applique) scene (on bare black Halloween tree) ..pumpkins,
cat, witch, ghost, bat, spider made as buttons
http://pg.photos.yahoo.com/ph/miss_meme_30/detail?.dir=d8c9&.dnm=53bf.jpg
(both
gone)
my
cane slices on an appliqued pine tree quilt block
scene
http://beadyeyedbrat.com/dianebquilt.jpeg
wear
devil horns with your costume . . .OR different kinds
of animal horns... OR ears, etc.??
....I think Linda
G. had originally attached them with a length of elastic through holes
in their bottoms (which was placed in back, under the hair, rather than under
the chin):
http://home.comcast.net/~caneguru/polymerpics/polymerhorns.html
....the clear elastic made for clothes and stuff is what I use
on my horns (Also helps because I have really short hair.) ...anything elastic
is good because you can knot it and cut it, and then you don't have to have tails
on ribbons, etc. CougarGrrl
...attaching with four regular
bobby pins. 1) Make 2 horns about 1-2" long, each with a base that is about
1/2 wide. 2) With the end of your pinky finger or something equally small and
rounded at the tip, push it into the base of each horn to create a shallow bowl-like
area. 3) Place two bobby pins on the work surface in the following manner; have
them form a narrow "V", with the loop ends touching. The bobby pins should be
vertical so when looking straight down, you only see two bars, when looking from
the side, you see the loops, etc. 4) Press the base of the horn onto the bobby
pins, where they meet. Pick up the horn, invert it and trap the two bobby pins
into the horn by adding a few bits of clay. 5) Determine whether the horn you're
working on is for the left or right side, the angle the bobby pins need to be
inserted into your hair and then gently curve the horn in the appropriate direction.
6) Gently place on your head to test their balance, size, curvature, etc. Then
remove, bake and cool! It took me about 10 minutes to make the two horns. ;-)
Desiree
http://www.desiredcreations.com/howTo_PJHorns.htm
...I did something similar, but attached my horns to small barettes...
and used the TLS/clay strip trick (see Jewelry
> Pinbacks) over the metal part on the back. Only problem I had
was my ultra-fine hair...so using bobby pins to help secure the barrettes
into my hair helped. Laurel
.....here
is what we did for ours... Get an inexpensive (wide) plastic headband that
fitgs snugly but not so tight that it will produce headache by end of event. Make
horns of approximate appropriate size... If desired, roll in glitter or sparkly
powder.. Don headband. Have assistant hold horns on the headband on your head
while you check for accuracy....Once horns are shaped, insert wire (long
enough to wrap many times round headband) into center and bake. When baked, allow
to cool (important step). ...Bend wire so it's parallel with bottom of horn, with
left horn sticking out to the right, right sticking out to left. One at a time,
super glue horns to headband. DO NOT do this while band is on head unless
you are bald. Wrap wires around headband and super glue ends. Let dry for 10 minutes.
Kim K.
...these can be made in all kinds of sizes, patterns, colors,
onlays, etc! (larger ones especially could be made hollow, or with
aluminum foil or Ultralight armatures, etc)
...see
Faux-Ivory for making real-looking ivory
or bone horns
Garie's various headbands ("The
Saint" --wings and star--....and a bird)
http://www.garieinternational.com.sg/clay/mask2.htm
...and also a dragon claw on rod ...a sword ......eyeballs
glasses
TREAT IDEAS
for Trick-or-Treat... (instead of candy)
see
my lesson on making ghost necklaces to pass out as treats, just
below in Ghosts
....also see skull rings, etc,
in Jewelry above
....necklaces on stretchy cording, hair items for girls,
other
quick techniques I'm considering
...all with a Halloween theme
somehow, or using Glow in the Dark clay...
....stamping
on gitd clay (e.g., with a bat, ghost or haunted house stamp), then antiquing
or backfilling to make stamped lines show up
....making transfers
directly on gitd clay
......or making decal transfers and placing them
over gitd clay
......or using gitd liquid clay (Polyglo) to make the decals
(decals could also be window clings... clings could also be made
with bits of GITD clay in non-GITD liquid clay too)
....placing
a molded skull or stamped item, etc., made of gitd clay, onto a non-GITD
background
....doing translucent canes with gitdclay and translucent
to float over a background
... using gitd clays in other canes...
or for doing or other surface techniques like "dragged lines,"
etc
....caned faces using gitd clay
....covered
pens ...or pencil toppers ...or invidual erasers made from
Eraser Clay
....stretchy Halloween figures or items made from
Bake and Bend clay
.........for
example, http://www.garieinternational.com.sg/clay/bookmark3.htm
....mini masks
....mini
puzzles (see Kids > Games
> puzzles for simple ways to do
....simple mini figures or items
like pumpkins, skulls, etc.
....crackling metallic
leaf as a background, etc. so gitd shows through
....using black clay
and metallic powders or embossing powders with stamps, stencils,
etc
....clay gun extrusions for simple Balinese Filigree
or other onlays
....spooky mask pendants
....mokume
gane ...with gitd clays ..or FimoSoft glitter clays and/or mica
clays
..."ghost image" mica techniques (with Halloween
themes)
....incorporating wire ... Diane B.
GHOSTS,
Glow-In-The-Dark...+ TRANSFERS, Clings-Decals
flat
ghost polymer treats (to give out for trick-or-treating)
... cut outs
...I made a few ghosties from glow-in-the-dark
clay to give as treats instead of candy this year
...I used a cutter
I made myself from a cat food tin, plus tiny cutters in shapes like ovals,
circles, triangles, leaves, stars, etc. for the eyes and mouth (for some I used
straws)
...I made scary ones and sweet ones so they could choose (for some
of the sweet ones, I used a bit of pink blush on the raw cheeks)
...after
baking, I added quick and cheap waxed linen cording threaded through a
tiny tube on the back to make each into a necklace.
...some of them got a
little toasty in the oven (Premo's glow in
the dark clay is obviously more sensitive to darkening
than Fimo's so those are now my Ghosties of Color -- later I tented
them and put a wooden block under my baking pan in the toaster oven and they stayed
light)
(...there's a lesson on putting a tubes on the backs of
the pendants so the cording doesn't show in Pendants
> Tube Holes... surprisingly, the black cording didn't show through the
GITD clay)
(..was afraid I might get a few complaints because it wasn't
candy, but that part turned out fine even for the older kids) Diane B.
http://i96.photobucket.com/albums/l163/DianeBB/Halloween/ghost_treats1_31k.jpg
....instead of cutting out the facial features, dark clay cutouts
or clay ropes could be laid on top etc.
....if you're not making
too many, it should be possible to create either the ghost shapes or the features
by using a hat pin or Xacto knife, etc, rather than a cutter.... each could
be individual that way too.... roll the clay to be cut firmly onto
a smooth surface like a tile so it will stick well before
trying to cut... putting the clay onto a surface which can be revolved
also will allow smoother cutting when doing curves and diff. directions, etc.
....What
a terrific idea! I am definitely making ghostie and black cats, etc for
Halloween giveaways next year! Dianne C.
....I would much prefer my kids to
get something like that over candy any day! Stephanie
MORE IDEAS for
trick or treat:
...make werewolf claws and teeth... Sonya
...I
have a blacklight I put in my porch fixture every year. I make ...severed
fingers and eyeballs
......also polymer clay pumpkin, ghost
(GID).... and bat pins for the adults the kids drag along with them
......(all are affixed to a card, of course, so the parents remember who it
was that remembered them).
......I charge the GID stuff under the black
light, and the effects last WAY longer.
......also figure I can write off the
supply cost as advertising ...these are easy to make, cheap, good advertising,
and fun for all ages. Laurel
Faye's
mobile of ghosts... mostly white ghost cutouts (flat), with
cutout eyes, etc.
http://community.webshots.com/photo/208105613/208113169rulxkq
Monica's
lesson on making a glow in the dark head for a handkerchief ghost
http://guide.supereva.it/hobby_femminili/interventi/2001/10/74469.shtml
3-D
ghosts (lesson) :
...make a rough head/body shape from clay,
bake; take a square of clay and drape it over the shape, folding
on the diagonal so you have a triangle shape, draped over (each side of
) the head/body shape - the points at the sides make the arms. Shape spookily,
and use a sharp knife or tiny cutters to make eyes & mouth
....
If you use glow-in-the-dark clay for the outer piece, use a darker
colour for the inner (so the eyes and mouth show dark)
but if you use white for the outer, use glow for the inner so
the eyes and mouth only glow!! . . . .add a loop or something for hanging. Crafty
Owl
...I once made a simple little sheet-drape ghost as a sample for a kids
class . . . BTW, how did you form your ghost? I thought of several ways, trying
to get it as simple as possible without wasting too much clay for the kids, but
I can't remember now if I draped a disk of clay over an alum.foil ghost
shape, then pressed down all around, or if I tried a modified pinch
pot first (I added black dots for the eyes). Maybe I should have made
it smaller...think it turned out about 3" tall. Diane B.
...I made #4 on the
pasta machine sheets of white clay and cut lil circles about 6 inches
across and draped them on foil cones after cutting the eye slits..
just before I fired them I stuck a tiny flat piece of black clay behind the
*sheet* slits to look like eyes... you can put a hook in the top to hang them
if you want to... obviously the larger the circle the larger the Ghostie...Dusty
. .Oh and Sculpter that I am .. I made some look like they had *arms*
under the sheet by kinda pulling it out a tad and making it point off in
a direction by stuffing a tad more foil under it to keep it up till
it was through fireing..(Dont forget to make the top of the Foil rounded or you
will get a pointy headed Spook!! LOL) Dusty
...Thomas'
lesson on draped ghost formed over baked clay form with glass
pebble in the top (to prevent sticking while baking) ... face painted on
after baking
http://pcpolyzine.com/0310october/ghost.html
lesson
on making a 3-D squiggle ghost with crazy-eyes with glow in the
dark clays for a pendant (plus long beads)
http://www.sculpey.com/Projects/projects_ghost_necklace.htm
lesson
on making small squiggle ghosts from tapered logs, with fringe-like
"hands" ... hands are flat strips cut into 4 long fingers at
the end (using air-dry clay, but same principles)... also diamond-shaped
squiggle ghost
http://www.makinsclay.com/US/eng/project_gallery/seasonal/halloween08.htm
lesson
on ghost with arms, and not-simple shapes for mouth and
eyes (black clay onlays... can also cut polymer clays with scissors, when
cooled, or even after baking if thin and still warm)
http://www.makinsclay.com/US/eng/project_gallery/seasonal/halloween03.htm
either
flat or 3-D ghosts could also be used in little scenes
Both
Sculpey and Premo make glow-in-the-dark (GITD)
clay (see the Translucents-Glow
page for info on their differences)
...Sculpey also makes GITD
colors --there's a sampler kit from Polyform with regular/yellow,
blue, orange, and green. Sarajane
...some of these colors are brighter
or more saturated than others though
Would Pinata Inks work well
to mix into the GITD clay to color them since they are so transparent and require
very little to tint? (see Letters-Inks
> Inks for Tinting)
skin....I didn't want the witch faces to be
flourescent green, so I experimented by mixing Glow in the Dark
clay with some (flesh-color) SuperSculpey. ....what I got was a
clay that made a normal skin tone for my witch faces but it also
glowed in the dark! ...It worked!!! Julie
....also for Dracula
or Frankenstein, or mummy?
Use glow-in-the-dark (or tint
with tiny bits of color) for features, faces, hands, etc
Garie
Sim made a number of very flexible bookmarks from Sculpey's
SuperFlex clay with Halloween themes:
Skinner blend ghosts ....
"pumpkin-head" ghosts
http://www.garieinternational.com.sg/clay/bookmark3.htm
liquid clay also comes in glow-in-the-dark
version called Liquid Poly Glo (6 colors)
http://www.puffinalia.com/glow/liquid_poly_glo.html
...these liquid clays can be baked in silicone molds (see Molds)
...or
they can be used in other ways similar to regular liquid clays
......decals
clings (see ghosts above, for example) or transfers of b&w images can
be made onto Liquid Polyglo .... these could look pretty cool at night!
I
had a thin sheet of raw, patterned clay that I had used as
a laminate several months ago. When I went to use it recently, it cracked.
I tried back-filling those cracks with liquid clay --but I colored
the liquid clay with gold. jayne .
...looks like grout in a
mosaic but outlines the pattern shapes
... this could be very interesting
if I had used some Liquid PolyGlo instead --imagine walking into a darkened theater!
....Better yet, spider web designs for Halloween! jayne
transfers
(decal type) could be placed over a backing of glow-in-the-dark clay
(the white areas of the image would show the GITD clay beneath)
Iris
W's lesson on making ghost clings for window (or will cling to paper)
...liquid clay (she mixed with some white glitter) is
squeezed onto smooth tile in shape of ghost and filled in... bake 5 min
...meanwhile
make facial features ... each eye a white disk of clay, with small ball of turquoise
pressed on, and tiny black ball on top of turq
...eyebrows are elongated triangles
of black... mouth flat black disk
...after baking, put small dab of liquid
clay on ghost for each feature and place on ghost... return to oven to 20 min.
http://www.michaels.com/art/online/projectsheet?pid=br030&categoryid=10
Donna's
translucent skeleton transfer ("paperdoll")
with skull cane & (website
gone)
my
bones make from glow-in-the-dark
clay, for necklace (add
photo)
Alan's creepy spider ....glow-in-the-dark
and black clays ...with patch of red on top of back
http://groups.msn.com/ALANpolymer/polyclaysculpture.msnw?action=ShowPhoto&PhotoID=32
see
much more on both glow-in-the-dark solid clays and
liquid clays ...+ fluorescent
colors and blacklight, etc
....see
Translucents-Glows
> Glow-in-the-Dark .....and also
Liqud Clay > Colored,
Glow-in-the-dark)
(here are
a few things from the Glow in the Dark page:)
....Bleached Premo
Translucent clay (as well as bleached fabric, with bluing, etc.....on
white shirts) will also glow nicely under blacklight.
...There's also GITD
pigment powder which may mix with translucent clay or GITD clay...don't
know.
...Also, adding a small amount of fluorescent clay to GITD clay
can pop the color even more.
....Back in my trick photography days (pre-clay),
I even experimented with using fluorescent (fabric and spray) paints, papers,
or posterboard, sometimes along with mirrors. I either drew or sprayed with
the paints, or added them thickly to water (I think it was water--why was I thinking
it might be liquid starch also?) in glass containers to just look luminous
and beautiful, and to take the shape of the glass, etc. ... could easily look
like a mad scientist's table, or just liquid in a vase of dead roses, etc.
(which could be sprayed fluorescent too).
Now that we have Liquid Poly
Glo, we could use that for small amounts... could even pour it back in the
bottle after Halloween. Or maybe it could be thinned with something cheap like
veg. oil for larger vases/applications?? Diane B.
SPIDERWEB
and Other CANES
pumpkin
canes, see above in Pumpkins
skull and weird face canes,
see above in Skulls
eyeball canes, see above in Eyeballs,
and in Sculpting-Body > Eyes
Candy's
many Halloween-theme canes..... bat .... ghost
....skull
....
etc.
http://www.velocity.net/~cam/
claysquared's
pumpkin ... skeleton...
spider...
ghost...
witch canes
http://www.claysquared.com/silly.htm
(click on Silly Millies Store > Go > Holidays > Other Holidays)
lesson:
use "indention" to create a spider web cane
by wrapping a white log with translucent clay (or black or
gray, etc.)
..then wrapping it again with alternating layers of
the same color (white/translucent/white/translucent)
.......(or
make a spiral cane from those two colors, white on the outside)
..then
use a thick side of a butter knife, tapestry needle, etc., to press
into the cane from the outside, all the way to the middle log, around
the log ...this will "drag" the lines down to form scalloped
concentric circles
.....(if this were made with translucent, it could
be placed partially over a spider or other Halloween image). Diane B. (see Canes
> Translucent)
http://www.pcpolyzine.com/2000december/chrysanthemum.html
(showing indention)
Cella's lesson: --Make black triangular
shaped log 2" tall with 2" sides
--Looking straight down on the butt
end of the log...bend your tissue blade to a curve...cut an arch from corner
to corner at the bottom base/edge of the triangle ....move up 3/8"; cut another
similar arch...repeat 3 more times.(You should have five slabs with
arched centers).
--Insert a thin sheet of pearl white between each
slab [ #4 on my Atlas]. --re-assemble to triangular cane. --trim excess.
--Wrap the two SIDES of the cane with sheet of pearl white, [#6 for me....half
as thick as your other pearl sheet...this layer will abutt other outer layers
when cane is assembled and will look tooooo thick otherwise]. DO NOT put white
pearl on the BASE of the triangulare cane. Trim excess.
--Reduce cane
to 1" diameter or as desired, keeping the triangular shape .
--Divide into
7 equal parts.
--Re-assemble as for kaleidoscope cane [white sides joined
to white sides...black staying to the outside edge].
--Slice into thick 1/8"
slices; pinch/shape joints/seams to seven points;
-- attach fat, juicy,
colorful, beadyeyed, fuzzy-legged spiders..... bake and finish. :o)
Cella in SDak, wondering if glow-in-the-dark clay would be kewler
than pearl white???
Sunni's lesson
...by inserting gray into a cube of translucent
http://members.spree.com/sip/sunnidaze/me/tutes2/spiderweb.html
Kim K's lesson...
I make a leaf cane with a translucent background and black or grey for
the "veins", then turn that into a kaleidoscope cane.
my
Halloween necklace, made with spider web cane
...and also
skull cane created
component style in Steve Wood class, and also tiny Halloween figures (earrings?),
hung on black plastic chain (ordered from the Oriental Trading Co. catalog..no
longer available?, but they do have "Stretchy Tattoo Halloween Necklaces"
that might be a possibility) --DB add new photo
MISC.
Halloween info
huge collections of links re everything
possible about Halloween (making things, inspiration, hisotry, etc.).. some
links dead
http://www.minionsweb.com/links1.htm
http://www.horrorfind.com
(dry
ice for "fog" ....can be bought at Walmart?, or at
liquor stores?)
colors associated with Halloween:
--orange,
green, purple, yellow... gold, silver, glow-in-the-dark (any tint)
... black, white
...for the scarier faces and skin, also
consider using non-traditional colors
......e.g., for faces-skin
(green, red, blue, black, gray) and features (e.g., using balls of red
or another color for eyes... could also be shiny from gloss
varnish)
some Halloween
symbols & legends http://www.geocities.com/slconfer/index.html
Play-Doh
Halloween, book by Kathy Ross (to be published in
Apr, 2003, but can be pre-ordered)
http://www.amazon.com/
...then enter Play Doh Halloween (Play-Doh Fun) in the search box
all about
bats
http://www.batconservation.org/index.htm
Jim's printable skeleton (print, cut out,
and pose), bats,
http://www.printmini.com/printables/holiday/hwskel.shtml
http://www.printmini.com/printables/holiday/hwbats.shtml
loads
of food ideas for Halloween:
…. body parts, etc.
(bones, eyeballs, hearts, etc.) and more
http://www.britta.com/HW/HWr.html
... http://www.joycesfinecooking.com/halloween.htm
http://www.party411.com/halloween-recipes.html
...http://halloweentreats.blogspot.com
...various monster face cupcakes... http://flickr.com/photos/22885125@N00/100795092
...
I made breaded chicken breasts that looked like hands. ...cut four
slits in the breast to look like fingers...bread breast and put sliced almonds
for the finger nails. NLJ
LOADS MORE
http://www.google.com/search?sourceid=navclient&ie=UTF-8&rls=GGLC,GGLC:1969-53,GGLC:en&q=Halloween+food
Dia
de los Muertos (Day of the Dead)
(see
more skulls, skeletons, etc, above in Halloween)"Dia
de los Muertos" ... Oct 31 - Nov. 2... mostly in Mexico
... a family celebration ....Nov. 1 is All Saints Day commemorating the
souls of dead children ("los angelitos" or little angels).... Nov. 2 is
All Souls Day when the souls of all the dead (los muertos) are honored.
...celebrations can vary by region, with some families waiting in their homes
for the arrival of the spirits, and others spending the night cleaning the tomb
area, picnicking in the cemetery by candlelight, often with music being played
..."it is actually a joyous time, when the skulls are made of
sugar and laughter and death dance in the streets, honoring and celebrating the
beloved souls of those who have departed".... "What at first may appear
to outsiders a bizarely macabre celebration is actually an important family ritual
that recognizes the cycle of life that is the human experience."
...though
it has pre-Columbian roots, and blends with them indigenous American and European
religious and cultural practices, it wasn't really brought into being the way
it is today until the 20th century?
history of Dia de los Muertos
http://www.duke.edu/web/carolinadukeconsortium/K-16_community/dayofdead.htm
http://www.mexicofile.com/historyofdayofthedead.htm
http://halloween.monstrous.com/dias_de_los_muertos.htm#origin
http://csumb.edu/events/dead/explanation.html
explanations
and images of various aspects of Dia de Los Muertos
http://www.mexconnect.com/mex_/travel/mjmendoza/mjmdiadelasmuertos.html
http://www.oaxacaimages.com/muertos.htm
http://www.mexiculture.com/dod/index.html
(including sand paintings & much more)
There is also usually an altar
of offerings (ofrenda, sometimes spelled offrenda) which can be in the
home or in the cemetery, or both... these are not for worshipping the dead, but
remembering and honoring them
........ofrenda often have several levels, and
are decorated in a specific way with things like:
photographs of the
departed loved ones, candles (one for each person?..to guide their way
back), flowers (especially bright orange & yellow marigolds and magenta
coxcombs) representing the fleeting quality of life, fresh and dried fruits,
favorite foods of departed loved ones (mole, tamales, red rice, hot chocolate,
e.g, & candies for children....not to be eaten by the dead but their aromas
enjoyed) and their personal items/toys or hobbies, palm leaves,
religious figures of saints/Mary/Jesus/crosses, special bread (Pan
de Muerto, slightly sweet bread loaf with coils of dough depicting bones or skulls,etc.,
on top), salt, water (to quench the thirst of the souls tired from
long trip, and to purify), papel picado (fancy cut tissue papers) ...copal
incense is burned to attract dead loved ones, to clear the air of any bad
spirits, and to speed prayers to heaven ...... the colors involved are
usually very bright and saturated
.........and often skeletons, sugar skulls,
etc., or other regional items
...the family gathers around the offrenda,
and shares memories of the departed, awaiting their arrival."
http://www.mexico-child-link.org/day-of-the-dead-mexico/day-of-the-dead-mexico.htm
(fancy altar)
The miniature
skeletons and skulls (calevaras and or calacas)
in particular can be great fun to make with polymer clay
...these skeletons
are going about everyday activities ... secretaries at their desks, merchants
ringing up a sale, singers and musicians bopping to a tune, all dressed up, hair,
hats, clothes ...and just bones.
...if large enough, these can be made with
pipe cleaner wire armatures and a little bit of clay, a touch of black
paint for eyes, nostrils and teeth ...anything else added is
window dressing. Nora Jean
Families look forward to shopping for these skeletons
(new pieces each year) to decorate their home altars and cemetery tombs.
....They are always depicting a happy skeleton doing something they
enjoyed when they were alive
....Another
way clay can be used for these skeletons is in dressing them... one thing
to do is to chop and toss some clay scraps, run through the pasta
press real thin, then drape those thin sheets on these little skeletons as clay
"fabric". Nora Jean
OTHER ITEMS
...masks of the dead (mascaras de muertos), often
wooden, sometimes painted... worn by masked skeleton figures representing
death, Grim Reaper?, dance in honor of their deceased relatives...the wooden skulls
are also placed on altars
...Dia de los Muertos ends November 2nd with mummers
wearing masks chasing the remaining souls back to the land of the dead.
...masks
can be made of papier mache... and are created to incorporate the aspects
of death and life.
http://www.norajean.com/Biz-Archive/MSAT/ClayArt/Swaps/DOD/Masks-001.htm
http://www.geocities.com/MotorCity/Garage/5326/mexiart2.html
http://www.cssd11.k12.co.us/springcreek/artistic_expression/2002_el_dia_de_los_muertos.htm
http://www.casacorazon.com/index2.html
...
candelabras (Tree
of Life) ... I'm not too
sure of the symbolism in them, but they are really nifty things to make in clay
in miniature. Nora-Jean
...returning
(Monarch) butterflies were believed to bear the spirits of the departed ... the
Aztecs believed in an afterlife where the spirits of their dead would return as
hummingbirds and butterflies
...sand
paintings (see under expanations and images just
below)
many crafts/images of Dia
de Los Muertos made by children (freestanding paper figures,
paintings, mosaics?, tablecloth...)
http://translate.google.com/translate?u=http%3A%2F%2Fwww.eactiva.com%2Fofr2002.htm&langpair=es%7Cen&hl=en&ie=UTF-8&ie=UTF-8&oe=UTF-8&prev=%2Flanguage_tools
altars
by older students
http://translate.google.com/translate?u=http%3A%2F%2Fspanport.cla.umn.edu%2Flangprog%2Fcourses%2F1003%2F&langpair=es%7Cen&hl=en&ie=UTF-8&ie=UTF-8&oe=UTF-8&prev=%2Flanguage_tools
miniature
dioramas with skeletons, etc.
http://www.casacorazon.com/index2.html
and http://www.holidays.net/halloween/calacas2.htm
Norajean's
Day of the Dead diorama.. hinged egg
http://albums.photo.epson.com/j/AlbumIndex?u=1751108&a=13492257&f=0
many
links for Dia de Los Muertos
http://www.mexconnect.com/mex_/feature/daydeadindex.html
....here
is the mother of all Dia De Los Muertos link pages. (some of the
links take a long time to come up, or aren't working, as it is with a lot of mega
link pages, and some of the sites are not in English for obvious reasons, but
click on all of them if you're into information gathering.) Nora Jean
http://muertos.palomar.edu
Los Mezitos Chicano Folk Art frames
(brightly colored, graphic)
http://www.animadesigns.com/chincanofolkart/chicanogallery.htm
Thanksgiving
& Autumn
Anyone
ever made a polymer clay turkey?
I once saw one made out of a light
bulb, but not with clay. I'm sure you could use one as an armature for the
turkey body and neck/head. Cover it in brown, and make your feathers, beak and
wattle. Michelle (see Covering/Glass for more on how to cover).
gingerbread
turkey (applicable to polymer too)
http://www.oconnellfamily.com/thanksgiving_gingerbread_turkey.htm
Christel's
turkey
http://home.online.no/~raje/Polymer/pins/christmas.htm
Adorables' turkeys... tiny pilgrim
busts... etc.
http://www.lavendera.com/Adorables/adorables%20front%20page.htm
(click on Thanksgiving)
Marcy's Pilgrims...
Indians...
turkey...
autumn leaves...
etc.
http://www.marcysclaypen.com/thanksgiving/thanksgiving1.html
Renee's Pilgrims
http://www.hopscotchcreations.homestead.com/Fall.html
Oscelyn's turkey...
pilgrims...
scarecrow...
tiny house...
ghosts...
etc.
http://www.whimsicalclaycreations.com/Autumn.html
Diane
creaturecreator's tiny figures, babies, scarecrow
http://medgrl.homestead.com/projects.html
Feat of Clay's (Ginny's)
tiny figures (& scarecrow) (gone?)
http://members.aol.com/ftofclay/minigal.html
THANKSGIVING & AUTUMN
Sculpey's
various lessons on Thanksgiving-Autumn themes
http://www.sculpey.com/projects_seasonal.htm
http://www.sculpey.com/Projects/projects_scarecrowcandles.htm
(lesson for scarecrow-fence centerpiece scene, mostly using molds... pumpkins,
etc.)
molds for autumn and Thanksgiving
(turkey, cornucopia, leaves, etc.)
http://www.houseonthehill.net/autumn1.html
Airzona
guild's various autumn/Thanks. items (turkey, leaves, mini basket
of apples, etc).
http://www.azpcg.org/documents/SwapAugust04.htm
AUTUMN
Chicago
Area PC Guild's Fall and Fall colors swap...plus Linda's acorn
http://www.capcg.org/fallbeads.htm
Claypen
chat's various autumn-related polymer items
http://www.polymerclaycentral.com/claypen_autumn.html
Sculpey's lesson ... leaves pressed
onto clay for veining, etc., then cut around; one leaf pressed to
each side of square glass jar
.... (autumn
colors created using Skinner Blend sheets ...green pearl to gold, or
red pearl to copper)
http://www.sculpey.com/Projects/projects_autumnleaves.htm
Leigh’s
lesson on real leaf ...impressed on clay sheet... cut
around (slightly larger)... leaf removed
... completely covered with
various colored metallic powders http://www.polymerclaycentral.com/poleigh/leaf.html
Denise
used using a paper
punch on
very thin clay to create
maple leaves (on pumpkins) for a scene
.........
(DB: add specific URL when she uploads photo)
Sharon
V's fairy baby in egg with autumn leaves (website
gone)
katbyte's
autumn leaves, etc. (website gone)(website
gone)
Linda
WP's lesson on making an Autumn scene ... lumpy ground...
fence... tomatoes... used as pen stand for carrot and broccoli shaped
pens
http://www.hgtv.com/hgtv/crafting/article/0,,HGTV_3352_1915128,00.html
(see
Houses-Structures > Backgrounds, for more info on lesson)
autumn theme house
and yard http://www.sover.net/~mck/gbpics1.htm
lesson for autumn house
& stencils/painting, etc.) http://www.oconnellfamily.com/autumn_house.htm
(gone?)
Connie
at SBPCG cleverly used a pine cone as the body of a turkey
...and polymer clay for feathers and tennis shoes
...or
could use a walnut or other nut...with polymer eyes, beak, feet,
etc., maybe even polymer leaves like those above
Elizabeth's
lesson on making a harvest wreath (8" grapevine) with lots
of veggies, a silver pitcher, "fabric"
...she
also has lessons for making apples, lettuce, bunch of grapes, corn on
cob, squashes, pumpkin, potato, tomato, lemon & lime, as well as on making
a tiny pitcher (she silvers one of them with a paint made from real metal
powder (Platinum pulver, etc.) and Diluent-Softener (lets sit overnight to smooth,
then cures, adding second coat if nec.), and a fringed "fabric"
underneath
... she bakes the items first, then presses them onto the fabric
or wreath with liquid clay and bakes the whole thing
http://polymerclayexpress.com/octo2003.html
short
book on sculpting cute characters, including Thanksgiving
theme (pilgrims & Native Americans)...also
rag dolls, $7.99
...."Special Seasons" by Design Originals
(# 3334) http://www.d-originals.com/polymer.html
Valentine's
Day
Sarajane's
lesson on making stamped and partially-powdered hearts (cut
outs, using cutters)
http://www.polyclay.com/heart.htm
many
hearts made from cane-slice sheets using very reduced, simple
canes (cutter used over plastic wrap to round edges?)
http://www.polkadotcreations.com/jewelry.html
lesson
making a heart silhouette cane using a cutter
http://www.polymerclaycentral.com/pcc/hearts.html
(can enter as guest)
Lisa
Pavelka's lesson (on making a simple "leaf" cane) which
could also be a heart shape...she by wraps a gold log thinly with silver,
then thicker with black... she then indents the cane and presses the gap
together, creating a short vein
http://www.hgtv.com/hgtv/cr_clay_other/article/0,,HGTV_3239_1397691,00.html
Donna Kato's lesson on covering a clay heart base shape with slices
of mokume gane
http://www.hgtv.com/HGTV/project/0,1158,CRHO_project_20284,00.html
http://www.mindspring.com/~janruh/clay/bargello.htm
Elissa's lesson
on making a solid heart shape by cutting a slightly-tapered-in-the-middle
log diagonally and rejoining
http://pcpolyzine.com/november2001/ezheart.html
(practice cutting same lengths!)
*Elissa's
lesson making flat-backed, symmetrical hearts in Polyzine, cutting
a teardrop clay shape in half
http://www.pcpolyzine.com/february2001/eheart.html
Candice's lesson on making
a "heart-shaping" tool, and on shaping heart canes or
making individuals hearts with it
http://polymerclaycentral.com/cyclopedia/heart_tool.html
Barbara's lesson on making a
heart shape by indenting her swirled (flat-ish) bicone
bead with credit card then pinching other end
http://www.polymerclaycentral.com/swirls.html
Diane V's lesson on making "swirl
heart" ...flat, heart shape from two long triangles
of Skinner blend clay, each spiraled at thin end, joined at spirals,
fat ends overlapped at bottom
http://www.polymercafe.com/images/sample01.pdf
(need Acrobat Reader)
Tonja's flat
heart, rolled at top to create curves of heart, made with long piece of Skinner
blend mokume gane
http://www.tonjastreasures.com/jewelry1/tn6.htm
Jan lesson
on using a rolled snail shape to cut in half, resulting in
a heart shape; can be mirror image --could do with other shapes too though (Jan's
"mirror image bargello shell" hearts)Dawn
C's many-hearts bracelet made with heart-shaped cutouts from
patterned clay sheets
http://hobbystage.net/art/media.cgi?site=teri&folder=*&group=1&page=*&id=1031141974-001573
Carly's
lesson on making double-sided, heart-shaped, beads using two filigree
findings, or other textures
http://www.geocities.com/lubellebeads/projects/valbproject.html
various
hearts by artbymegan ... cut out with heart cutters... some onlaid
...
some painted on with oil paints in liquid clay (and/or glittery
or pigment inclusions) here and there
http://www.flickr.com/photos/theartofmegan/sets/72157603798267827
Julia
S's lesson on making larger "candy" hearts (aka conversation
hearts) with stamped or needle-drawn text
.... she used 1"
cutters to cut out 1/4" clay sheets... then used metal stamps,
or drew inside small lettering stencils, with a needle tool to make the text (in
this case, max. of 5 letters possible per line)
http://www.polymerclaycentral.com/valentinehearts.html
......if stamped or carved, could be backfilled with "ink"
colors, if desired (see Carving > Backfilling)
my mini "candy" hearts with written messages
(for decorating a gingergread house)
......cut out with mini-cutters
from pastel clays.... text written by hand with very- thin-tipped, permanent
ink pens
.....(using original white Sculpey in the box will make
the surface look the powdery-est, though don't think I did)
http://i96.photobucket.com/albums/l163/DianeBB/Christmas-winter/1681.jpg
...for
more ways to do lettering, see Letters-Inks
> Lettering
heart swap
http://www.polymerclaycentral.com/pcc/swapheart.html
Chicago Area PC Guild's heart swap
http://members.aol.com/CAPCG1000/heartbeads.htm
Sculpey's
various lessons on Valentine themes
http://www.sculpey.com/projects_seasonal.htm
Juli
McCarthy's dragged-lines heart shape
http://members.aol.com/CAPCG1000/pendantswap.htm
*Elissa's many hearts (symmetrical and not, mokume, etc.)--see lesson link
below
http://members5.clubphoto.com/elissa934324/2841514/guest.phtml
(.....NO LONGER at http://hobbystage.net/art/elissaheart/
(gone))
Terry's chrysanthemum
cane heart pendant & earrings
http://www.cerridwencreations.com/art/xmas%20gifts/heart_neclace_earrings.JPG
Marcy's
pieced patterns for her "big hearts" ...creates the diff. sections
with cane slices, onlaid bits, all kinds of things
...she also separates the parts of her pieced pattern sheets
by laying clay gun ropes, or strips of pattern, or dimensional
dots,etc. along their edges
http://www.marcysclaypen.com/hearts/heart4.html
(click on all galleries)
many hearts
at Clay Pen (...including Muriels' Natasha-bead symmetrical-pattern hearts)
http://gallery.gundo.com/gallery/album59
(2 pgs) (or http://www.polymerclaycentral.com/masterindex.html
ClayPen photos)
Patricia's many hearts, mostly with cane slices
http://reve.roche.free.fr/patbrochcoeur.htm
cforiginals arty hearts with onlays and other embellishments ...
impressions, mixed media
http://store.cforiginals.net/hearts.html
Karen's Valentine jewelry
http://hometown.aol.com/antkar/page13.html
Kim
K's simple textured &, metallic powdered hearts, for "Technique"
swap
http://www.beadyeyedbrat.com/janruhswap.html
Bob's
layered, onlaid hearts
http://www.crosswinds.net/~rwiley/clay_gallery.html
Susan's
lesson on making a two-layer heart pin with impressions and
2 colors of metallic powder (+ onlays of flowers & leaves)
http://www.theclaystore.com/pages-tutorials/polymer-clay-project-tutorials.html?action=showTut&tutID=39
Meredith I. cut strips
from a crackled leaf sheet and formed them into shapes to add
as onlays on her heart pendant (spiral, heart, 3 parallel straight
lines slightly separated, 2 parallel S-curved lines)
http://bangertmusic.tripod.com/trufflestreasures/id4.html
Rachel
A's hearts --paisley-shaped, overlaid, crackled foil covered pieces
http://www.imagestation.com/album/?id=4292456065&p=4266957913&idx=12
Valerie's cracked gold foil & blue heart
http://falczx.homestead.com/Beadings.html
Dave's earth-colors mokume hearts
http://www.earthpottery.net/clay1.htm
Barbara
C's log (tapered at ends)...ends rolled up toward each other (center)
to form heart shape, with spiraled tops)..somewhat flattened on bottom
http://www.geocities.com/sopcg/MemberBB.html
Desiree's "heartful tears" heart (sort of patchwork, with
2 paisley-shaped overlaps)
http://www.pbase.com/image/64748
Beadazzled's
large freestanding hearts on stands with embellishments (seed
bead effect could be replaced by texutring, etc)
http://www.beadazzled.com/heartgalleries/classicalgallery.html
Darla's
(Celtic Dolphin) symmetrical Natasha hearts
http://hobbystage.net/art/celticdolphin/canework/1010838563-000284.html
(gone)
Trace's symmetrical
pattern hearts (see Natasha beads in Beads
for more) (website gone)
*HelenClayArt's
cane onlay and twisted with flowers hearts
http://www.homestead.com/HelensClayArt/page3jewelry.html
(gone)
Melnik's heart amulet pendant (formed over an armature, but hollow --see
Vessels-Rock for more info) (website
gone)
faun's mosaic heart (website gone)
*Annie's many interesting hearts, some with wire, etc. (website
gone)
Matilda's candy cane
hearts, twisted pastel beads, and bead-wrapped heart (website
gone)
Petra's hearts covered with
translucent canes (website gone)
nightshade's little hearts on a pen (website gone)
claydaze's discrete
stacked pinks heart shapes (website gone)/
Emily's
many hearts, many marbled (website gone)
Darlene's
heart canes made with
Skinner blends (website
gone)
mica
effect patterns (sheets, or large cane slices) look great when cut out with
a heart cutter...They can be left as is, or bordered/stacked
with a frame behind, or added to, etc. (see Mica
for more info).
......heart cutters can be used
with a patchwork technique too
. . . Jenny uses 2-3 strips of twisted
mica ropes (see Mica > Buesseler >
beehive) to separate 3-4 sections of her cut out hearts... her patterns
are symmetrical
...to see more on the patchwork/collage technique, see Sheets
of Pattern > Crazy Patch)
Use
the heart as an accessory, e.g.:
Tara created an animal (penguin)
holding a heart and gift, & dragon with hearts on base
(gone)
Eberhard
Faber's mini lesson on making whimsical molded clay shapes for drawer
handles (even on tiny boxes?)
....(the heart-shaped ones appear
to be set forward somehow --with another shape behind?--- so would work well for
grabbing, but the top shapes lie flat against the drawers and woulnd't seem as
functional)
http://tinyurl.com/aw7cf
How
about a (freestanding) heart-shaped box formed with a cookie cutter (see
Vessels & also Vessels/Rock,
etc.)...
I got a heart (-shaped box) full of chocolates .... $1 each for porcelain
valentine boxes, and $1 each for wire baskets, heart shaped. That was from CVs.
GCivy
....several Valentine miniatures lessons, including chocolates
and heart-shaped box
http://miniatures.about.com/library/weekly/topicsubclay.htm
...Desiree's
covered
heart-shaped Altoid box...one turned into
a hanging purse
http://desiredcreations.com/gallery3boxes.htm
Nancy's covered
heart-shaped Altoid box...
covered with chrysanthemum canes, feet (website gone)
or
a heart-shaped house, or regular house with Valentine colors, items (see
Houses/Structures)?
--with or without decoration (candy hearts, cupids, chocolates, ribbons, etc.),
...Flo's
Valentine scene in with a backdrop of heart box lid (not clay but
could be)
http://www.picturetrail.com/gallery/view?p=999&gid=1656249&uid=155794
or in a scene (Houses/yards,
Sculpture/ Websites) --small scene
like Tara's above, or larger one in any setting, illustrating a romantic theme,
etc.
Donna Kato on 11/21/2000 Home Matters ...made
a heart shaped box necklace.. not sure what you call it really.. anyway..
first she took red clay and hand pinched it till it was about 1/8 inch thick (what
she said.. i think it was thicker). She kept pinching the sides and pulling them
up until she had like a little red balloon that was totally closed with air inside.
It had kind of a point on it from where she closed up the pinching process, so
that became the point of the heart. The heart looked to be about 2" square. Then
she took a stick and made a groove in the top for the heart shape.
Next she
took black clay and put a ball of it on a stick and rolled it into a tube. Then
cut it in 1/2 so she had 2 pieces about 2-3 inches long. She rolled one end of
each to make a point so what she had was 2 curvy pointed things with a hole on
one end. She attached these to the sides of the heart sort of like handles with
the opening on top, point down. Baked the thing, let it cool, then sliced it in
1/2 horizontally across the heart and the black things. Attached a cord thru the
top part of the black tubes and into the bottom part so the 'lid' could slide
up and down on the cord. fimomeelmo
i use cookie cutters
,tiny ones .... i do (stacked) hanging hearts you need cookie
cutters of graduating sizes... WILTONS has them the tiny ones are from
(O)off the (B)beaten (P)path. so i cut out the heart on the #1 on pasta machine...
3 or 4 up to 6 .put a hole in top and bottom of them except the last (top) heart
bottom .after they bake you attach them with ribbon ,or something.they look cute
.you can impress them with stamps... i made clay ruffle on the back
all around the hearts by rolling a thin snake running it thru on #5 and gathering
it up and pressing it onto the back side of the heart. ~also i tried the translucent
for the first time i tried mixing it with real old purple fimo . it came out textured
in the end and it looks cool... then i tried the super sculpey ,mixed with
colors and i like the feel and colors .they sort of look muted and country. patti
Elizabeth's
faux "gingerbread" cookie (pin?) ...(heart shaped),
"frosted" around the edge with fluted faux icing... a single
small rose placed in the center of the cookie
http://www.picturetrail.com/gallery/view?p=999&gid=646448&uid=488109
I
make "chocolate" rabbit pins out of brown Premo and a cookie cutter. Trina
St.
Patrick's Day
Associated themes: shamrocks
... the colors green & emerald... leprechauns... gold
nuggets
also: rainbows & clouds ...pots of
gold .... elf-ish top hats or shoes ... red hair (or
black hair) ... green eyes ...green beer (if you're old enough)...
parades ... miles of green grass divided up by gray rock walls
(Ireland, countryside)
....to get some good ideas, try searching
for St Pat's clipart
.........try this from Google: http://images.google.com/images?sourceid=navclient&ie=UTF-8&oe=UTF-8&q=%22St%2E+Patrick%27s%22
DB.
....Along with what has already been mentioned...the rainbow to
the pot of gold . . . Erin Go Bragh. Kim2
(True
shamrocks have 3 leaves ... 4-leaf clovers have 4 leaves.
Kim2)
If you put 3 heart shapes together (tails to the middle),
a clover shape will result. Can't remember if shamrocks are technically 3 lobes
or 4, but the general idea will be there. I made some earrings long ago from combined
green hearts, a gold do-dad in the center to cover the join, and a small
bit for a tail/stem
Sculpey's
various lessons on various St. Patrick items
http://www.sculpey.com/projects_seasonal.htm
beadizzygrl's
lesson on making 4-leaf clover cane (could also make
3 leaves for a shamrock)
http://hometown.aol.com/fourleafcl1064/page80.html
(multi-clover
cane on beads for a bracelet) .http://hometown.aol.com/fourleafcl1064/page82.html
simple sculpted shamrocks
http://www.parenthood.com/articles.html?article_id=9526
Marie
S's "Kiss Me" necklace, made with faux stone or
ivory impressed with letters or pattern stamps, then antiqued with
brown, and green bas relief shamrocks
http://www.clayfactory.net/marie/02-07-04/pages/irish.htm
lesson
on miniature shamrock cookies and pie
http://miniatures.about.com/library/clay/blrecipe031200a.htm
(gone?)
Adorables' shamrocks, elf, etc.
http://www.lavendera.com/Adorables/adorables%20front%20page.htm
(click on Easter/Thanksgiving)(gone?)
Darlene's
Skinner blend shamrock cane slices (website gone)
claydaze's shamrock & 4-leaf clover cane slices (website
gone)
my real shamrocks and leafed clovers (website
gone)
Bonnie W's lesson on making a (Christmas) elf (for
St. Pat's day elf, just don't use red-and-white stockings)
http://www.sculpey.com/Projects/projects_CandyElfSnowGlobe.htm
Jan Ohio's elves (holding letters)
http://www.jjacksondesigns.homestead.com/Elves.html
Vikki's
bas-relief leprechaun
http://community.webshots.com/photo/46020810/46021010NpOaQz
Adria's lesson on two leprechaun
heads used with medium thickness black elastic
http://www.sculpey.com/Projects/projects_LuckyLeprechaun.htm
Marcy's
leprechaun figures and heads ...with dark brown beards... wearing suspenders
with decorative "clips", lederhosen and long socks, hats... some pants
green & white checked ... shamrocks here and there on clothing
http://www.marcysclaypen.com/stpatrick/stpatrick.html
Babette's
little elves dressed in Christmas colors
http://www.babettecox.com/polymerclay.htm
(click on 10 Little Elves)
Fayette's leprechauns
and other elf figures
http://www.picturetrail.com/gallery/view?p=999&gid=778630&uid=492837
Marika's
lesson on making elf-type shoes (with pointy turned-up toes)
http://members.home.nl/asrai/cursus-en.htm
(click on Boots or Lessons)
Marlie's bas relief
leprechaun, rainbow and pot of gold... on a CD
http://www.mcuniverse.com/Painting_with_PC_-_Leprechaun.901.0.html
(new--redoing website)
various
St. Pat hats, images, clothing, jewelry, etc.
http://www.unitedmaskandparty.com/Theme_Party_Supplies/st_patties.htm
clover
designs with wire (and other?)
http://jewelrymaking.about.com/library/blwhol.htm
Tamara's
canes (mini)..... leprechaun, his hat, pot of gold, rainbow, etc.
http://www.designcanes.com/stpatsday.htm
lots
of graphic paintings filled with images for St. Patrick's Day
http://community.webshots.com/album/278918410IddKaT
(may be very slow loading)
(use
Search feature also to look for elf or elves on other pages)
SPRING
+ Easter + Mardi Gras
Sculpey's various lessons for Easter and Spring items...bunnies,
various
http://www.sculpey.com/projects_seasonal.htm
http://www.sculpey.com/Projects/projects_SpringTimeFrame.htm
Makin's
lessons on rabbits, baskets, eggs, etc. (for air-dry clay, but most
of the principles the same for polymer clay)
http://www.makinsclay.com/US/eng/project_gallery/easter.htm
Marcy's Easter eggs (with horizontal or diagonal onlaid rows
of pastel ropes or strips, or simple flowers/leaves here &
there)
.... also bunnies and carrot pin
http://www.marcysclaypen.com/easter/easter.html
Marie
Segal's eggs (various types)... plus bunny cane, rabbit face
cane... bunny figure standing next to egg, etc.
http://www.clayfactory.net/marie/gallery8.htm
Becky
Meverden's lesson on making a cute bunny with long ears, using blusher
powders for a little color
http://www.hgtv.com/HGTV/project/0,1158,CRHO_project_34872,00.html
artful's lesson on making a very simple bunny (she uses a bit
of wire between each ear and the head which allows them not to have to be pressed
against the head so much... she then adds bits of paint (2 dots for eyes) or clay
eyes & accessories to make bunny characters --pirate, etc.
http://www.the-artful.net/Making_of__Bunny_by_Shiritsu.jpg
Marie's
lesson on making a seated rabbit (including face closeup)
and chicken on a wood dowel (ears glued onto mini straw hats)
http://www.sculpey.com/Projects/projects_WoodenWascals.htm
Jacey's
miniature chocolate "diorama" eggs with tiny pastel
colored flowers & leaveson top, and impressed white "icing"
around a faux join
....mini faux-hollow chocolate bunnies (brown, white)
...
also pastel-colored petit fours and .... bunny cake
http://www.geocities.com/sopcg/MemberJacey.html
lesson
on making chocolate bunny and colored eggs to go in Easter basket (miniatures),
by Kris Richards
http://www.sculpey.com/Projects/projects_easterbunny.htm
video
lesson on making a rabbit with plasticine over a twisted wire armature
(but do the same with polymer clay), by Harriet, for a Wallace&Grommit "Were-Rabbit"
http://www.youtube.com/watch?v=omhYBHFY75U
Christel's
lesson on making a "rabbit" hair holder, using elastic for holding
the hair and also for the dangly feet and hands (16” total elastic)
http://www.pcpolyzine.com/0203march/rabbit.html
(click on any photo to see enlargement)
http://home.online.no/~raje/Web/Rabbit/full/2002_0201_202602BB.JPG
(rabbits, with clothing)
Celidonia's wonderful, tinted-translucent
bunny (and teddy bears)
http://www.celidonia.it/English/others_paths.htm
Banu's lesson on making coil basket and carrying
handle with rope of clay... adds flower to side
http://tutorials.theclaystore.com/1/coiled-basket
Maria's
lesson on a making openwork basket (not-woven) with
radiating (and ovelapping) loops of clay gun ropes pressed onto
a central disk... twisted rope circle is added over the joins... then the whole
(daisy looking) shape is turned upside down and draped
over a form (small jelly glass?) and baked (see
Vessels > Draped Bowls)... she also
adds a twisted-rope handle and flower embellishment over join of handle
http://guide.supereva.it/hobby_femminili/interventi/2002/01/87224.shtml
.....(baskets
could also be woven, or could use a clay braid or crocheted clay... see
Clay Guns)
Sugarcraft's
egg diorama molds (or make your own) --these made of plastic though?
http://www.sugarcraft.com/ (on
left, click on Holidays > Molds)
Elizabeth's
pastel spring-like colors (sheet, and stacks created by cutting
a Skinner Blend sheet apart... adding Pearl clay lightens the colors even
more)
http://thepolyparrot.com/blends.html
(bottom of page)
Bunny's
lesson on making a rabbit and Easter eggs for a basket
http://www.thewildbunny.com
(lessons to come back soon... or back now?)
about.com's lessons on miniature eggs (in basket with
grass, and more) gone?
http://miniatures.about.com/library/clay/blrecipe040900a.htm
Candy's
pastel patterned Easter egg cane slice (website gone)
claydaze's Easter egg cane slices (website gone)
Trina's clay-covered papier mache basket, with Easter eggs inside (website
gone)
Trina's filigree mosaic technique (on Easter egg pins,
etc.), using larger ropes than usual B.filigree?, in different colors to fill
in mosaic pictures or patterns (website gone)
small
bunny pendant made from wire and crystal beads (could use polymer
beads instead)
http://jewelrymaking.about.com/library/weekly/aa041700.htm
Easter
egg buttons (eggs, chick, carrot)...flat-backed
http://www.craftsnscraps.com/buttons/buttons4.html
spring
colors house and yard scene, with bunnies on lawn (jelly
beans, frosting, and painted? candy corn)
http://www.frankysattic.com
(click on: Gingerbread by
Alice)... whole site gone?!?!
Sarajane
Helm's book, Celebrations With Polymer Clay, includes
lessons and examples of Spring canes (including Easter
egg cane slices)... May
baskets, Easter bunnies,,
covered eggs, etc.,
... also miniature Mardi Gras masks
http://www.polyclay.com/cwpc.htm
(see
Eggs for many ideas on how to cover or otherwise use eggshells)
(see Sculpture websites for more bunnies,
and chicks?)
Kim K's Mardi Gras swap items (jester, masks, more)
http://www.tlcnet.com/~polyclay/irmardigras2002.html
someone
made fabulous "mosaics" with leftover Mardi Gras beads
(photo?)
Fourth
of July
Donna's
4th of July pen and stand
(website gone)
Adorables' few themed things (must click on Easter/Thanksgiving first)
http://www.lavendera.com/Adorables/adorables%20front%20page.htm
Suzanne I's Black and White Uncle Sam's
http://www.picturetrail.com/gallery/view?p=999&gid=279317&uid=149408
Susan's , flag pins and hearts, patriotic frames
around an eagle transfer
(website gone)
Sculpey's
various lessons on flag and patriotic themes
http://www.sculpey.com/projects_seasonal.htm
Home
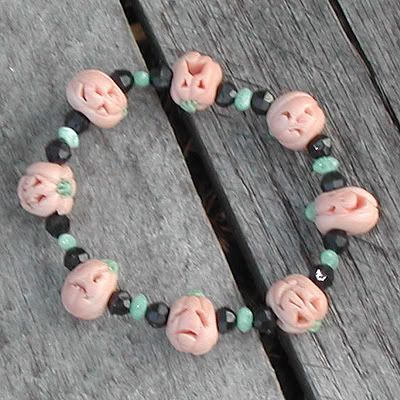
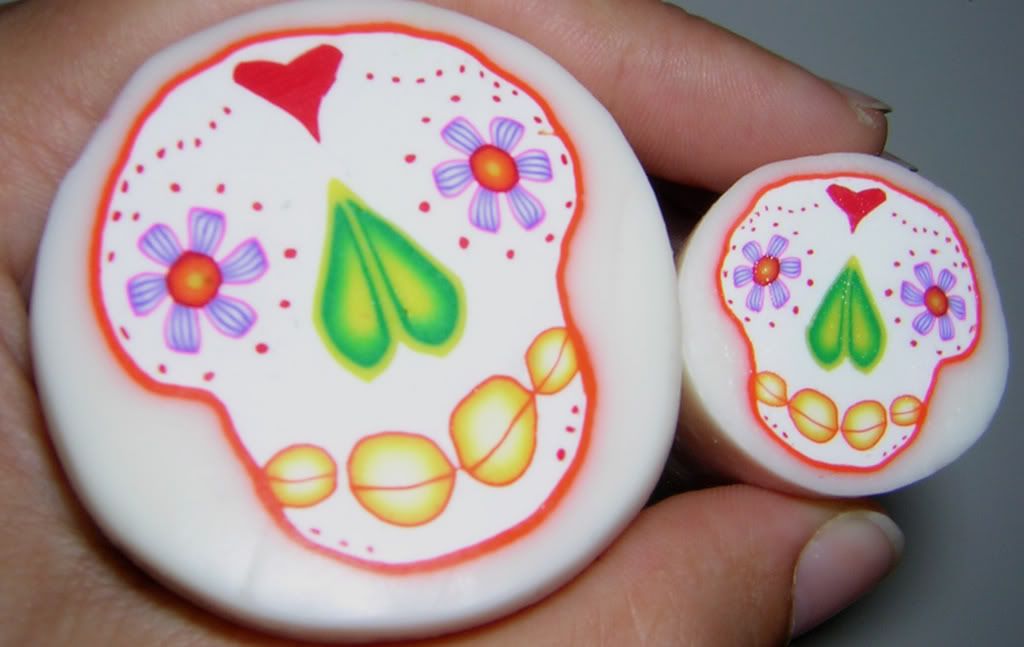
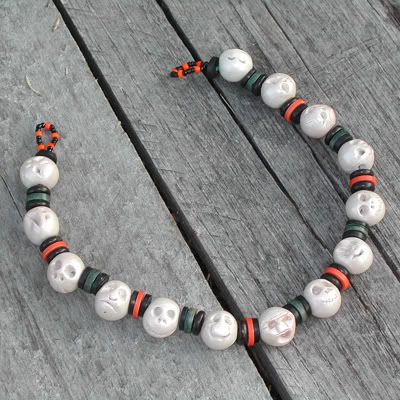
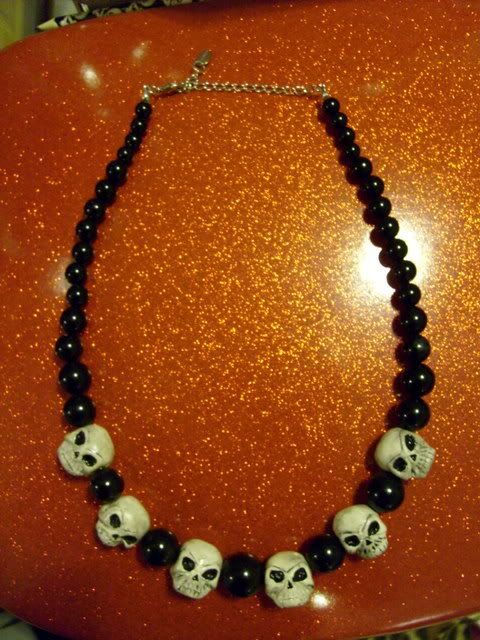
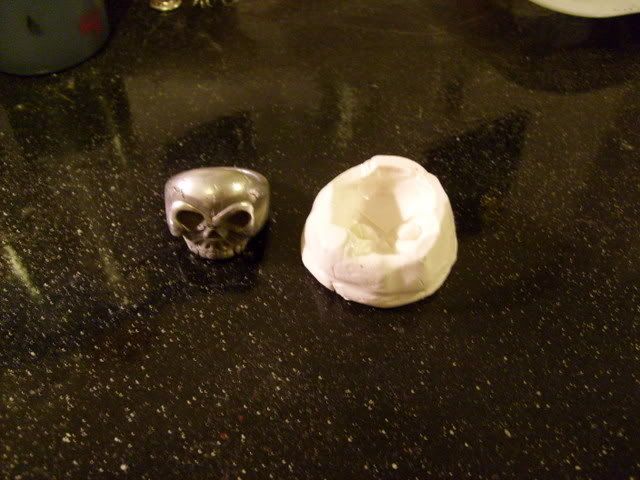
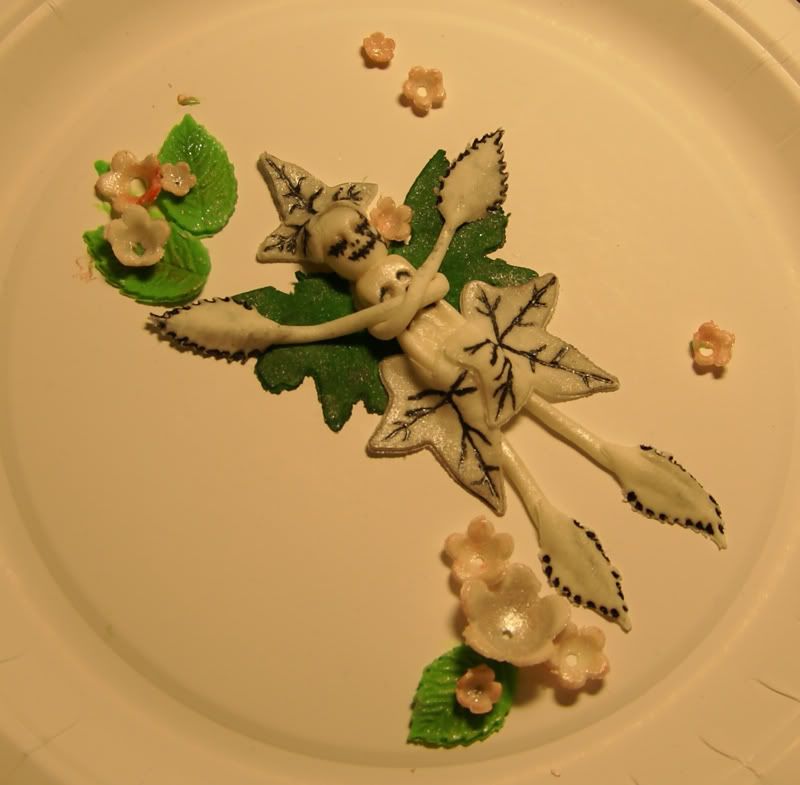
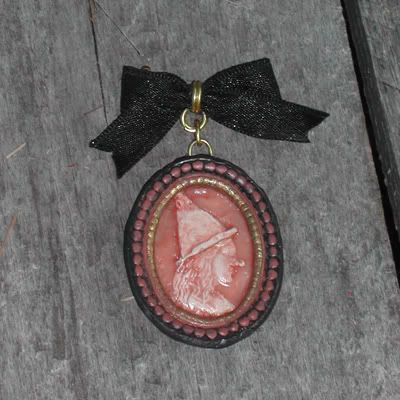
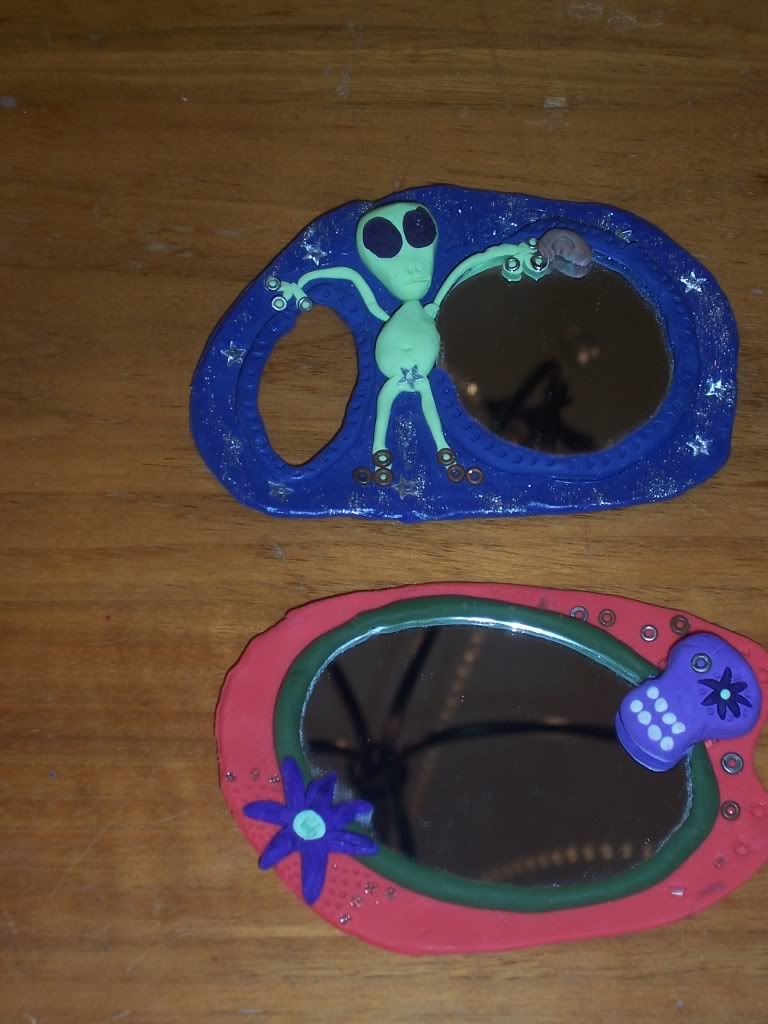
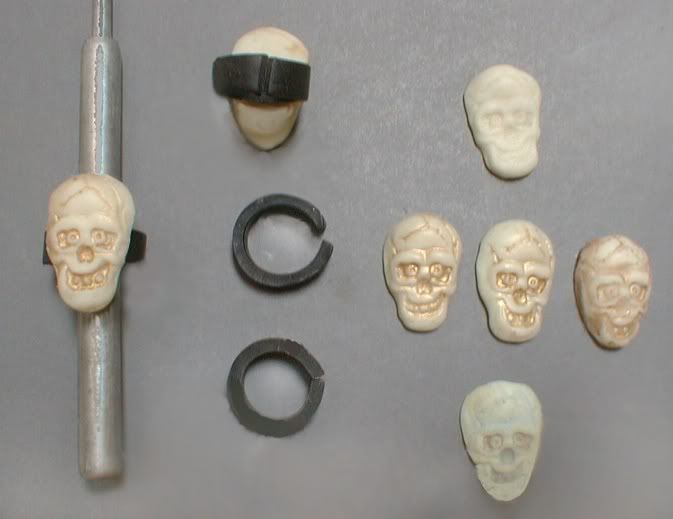
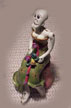
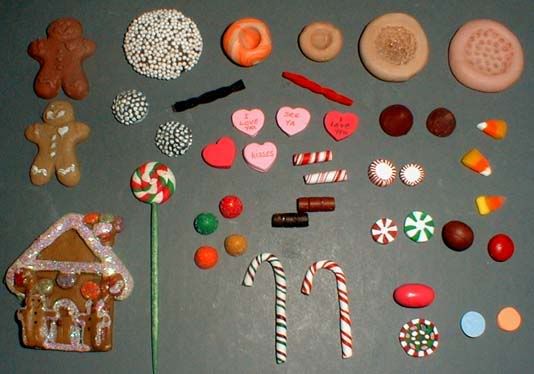